Setting up the WiFi Pineapple NANO
What is a WiFi Pineapple, how does it work and what makes it such a powerful pentesting tool? This article covers that and how to set one up in Windows 10.


One of my favorite parts of the security awareness demonstration I give, is the live man-in-the-middle attack. Mainly because it always yields good reactions of people in the audience who then realize why it is that they should be careful on public WiFi's, note the security signs your browser gives you and why HTTPS is better than HTTP.
I have been considering buying a WiFi Pineapple for a while to play around with and spice up my live demonstration. After seeing Troy Hunt use his Pineapple live during one of the Hack yourself first (YouTube) workshops this summer in The Netherlands, I decided to finally order a WiFi Pineapple NANO Tactical Elite.
WiFi Pineapple, how does it work?
So, what does this WiFi Pineapple actually do that makes it so awesome?
Auto connecting devices
Many smartphones, laptops, tablets, IoT devices, etc. use network software that automatically connects to access points to which they have logged on before. If you own a smartphone, you probably don't need to enter your password to connect to your home WiFi network whenever you arrive at home. Your smartphone will attempt to connect automatically, using its stored credentials to logon.
Your Smartphone knows the SSID (Service Set Identifier, the unique identifier of a Wireless local network, or the name of your WiFi network) of the networks it connected to before. Your device will attempt to connect to a network as soon as you turn on the device's WiFi, or reconnect when you lose connection to a WiFi network.
Pineapple sandwich
Let's say you're in a crowded Starbucks with people connected to the WiFi network called "Starbucks Free WIFI". Devices that know this SSID and are in range, will automatically attempt to connect to it.
For an attacker, the WiFi Pineapple can create a rogue access point with the same SSID "Starbucks Free WIFI". It will then allow access to anyone trying to connect to it and be a man-in-the-middle for that person's Internet connection.

Disconnecting existing connections
What about coffee-drinking hipsters already connected to the Starbucks WiFi? In order for the man-in-the-middle attack to work, it would require them to disconnect and reconnect to the rogue access point. Can this be forced? Yes, yes it can by performing a deauth attack.
The IEEE 802.11 (Wi-Fi) protocol contains the provision for a deauthentication (deauth) frame. Sending this frame from the access point to a station is called a "sanctioned technique to inform a rogue station that they have been disconnected from the network". In other words, it tells the access point that a certain device is no longer connected. The device will be denied service and is required to reconnect to use its services again.
An attacker can send a wireless access point a deauth frame at any time, with a spoofed address for the victim. The protocol does not require any encryption for this frame, even when the session was established with Wired Equivalent Privacy (WEP) for data privacy. The attacker only needs to know the victim's MAC address, which is available through wireless network sniffing.
This was just one of the many possibilities of the WiFi Pineapple's network arsenal. I will be writing about other tricks up its sleeve in followup blog posts. In this article I will focus on setting up the device to work with Windows 10.
Unboxing the WiFi Pineapple NANO Tactical Elite
Below is a picture I took of the contents of the package that arrived in the mail.
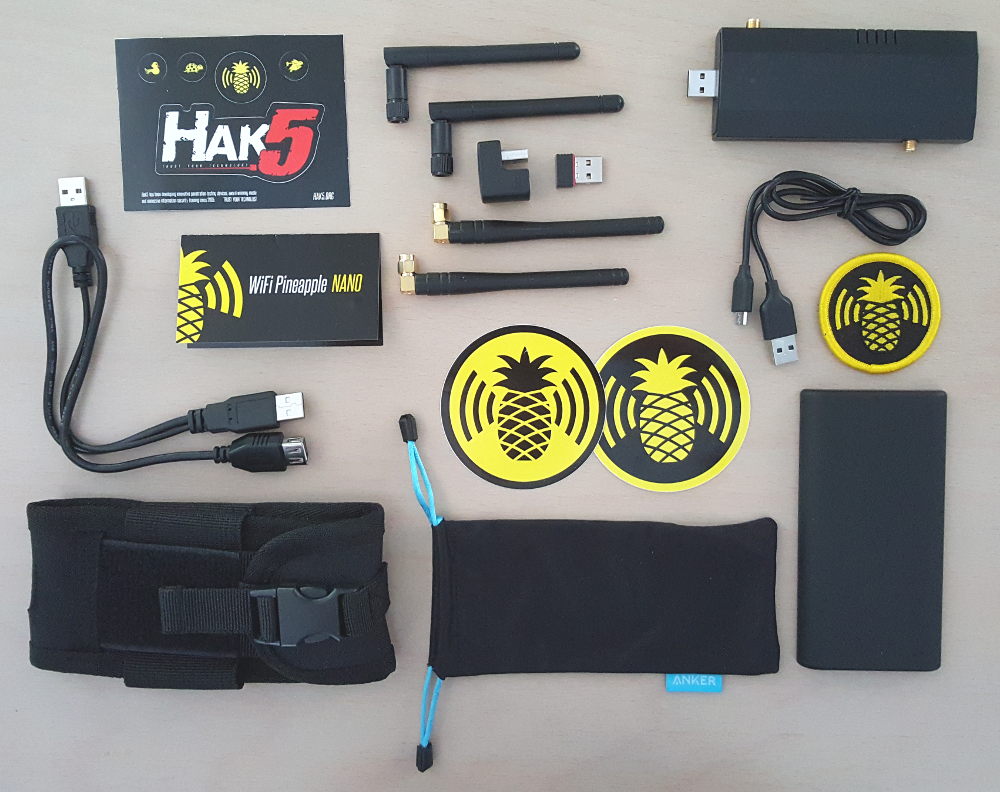
- WiFi Pineapple NANO
- Basic Antennas (2x)
- 90° in-case 500 mW antenna upgrade
- USB Y-Cable & USB adapter
- EDC Case
- Anker PowerCore Slim 5000 battery
- RaLink RT5370 (tertiary radio)
- Morale patch and stickers
Great stuff! Now let's set it up.
Preparation
Prepare your setup by downloading the latest Pineapple NANO firmware from https://www.wifipineapple.com/downloads (or direct download).
Connect the NANO to your computer using the included USB-Y cable or plug it directly into one of your USB slots. As soon as the blue light stops blinking, it's booted.
Browse to http://172.16.42.1:1471 (Only Chrome and Firefox are officially supported).
You will be greeted with the welcome screen:

Setting up the Pineapple
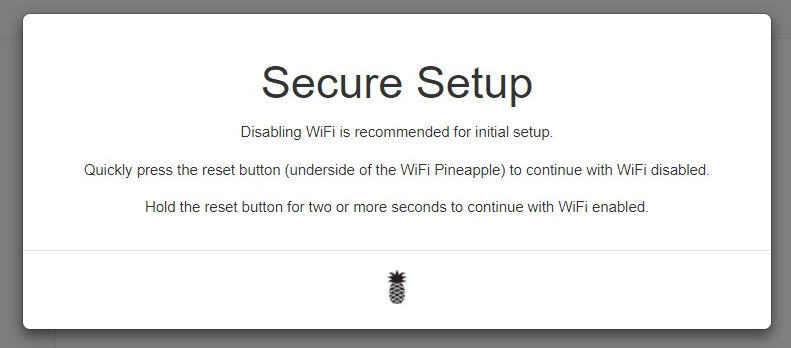
On the welcome screen click continue. This will show the following screen:
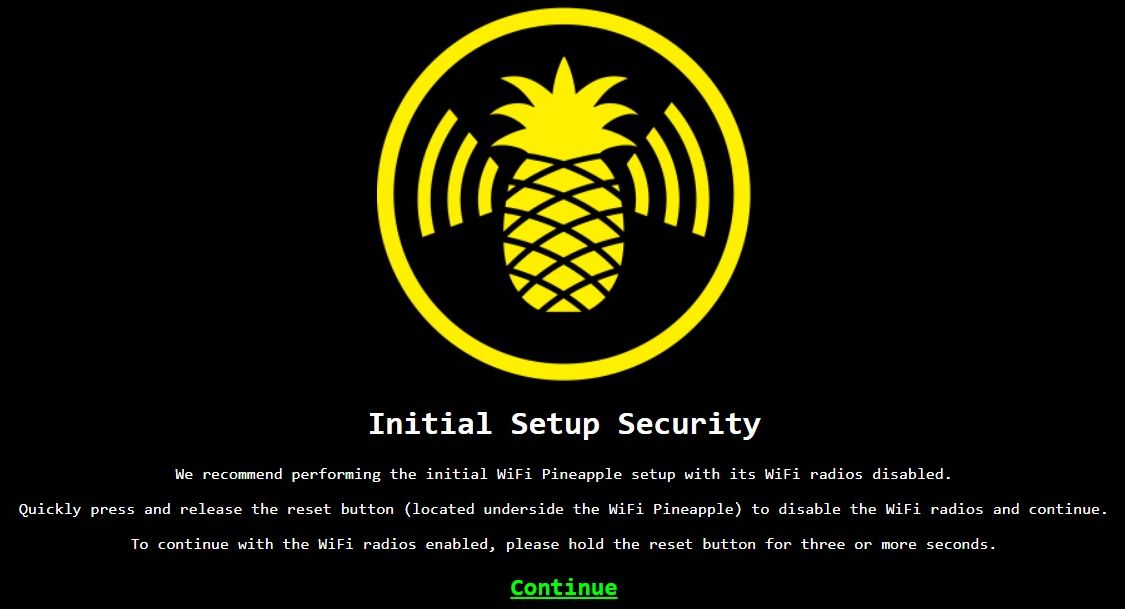
As it is written on screen, quickly press and release the reset button located underside the device to disable the WiFi radios. You won't see any feedback from the led, so you'll have to do with the feedback of your fingers pressing the button.
Click continue. The next page will display:
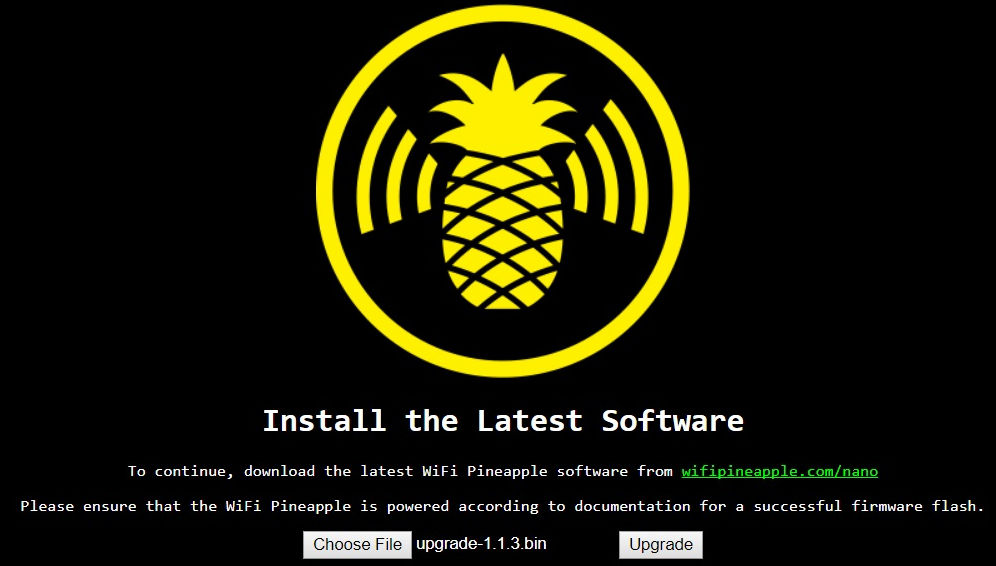
On this page, press the 'Choose File' button and select the firmware file you just downloaded. When done, the filename will be displayed in the label. Press the 'Upgrade' button to continue, loading the following page:
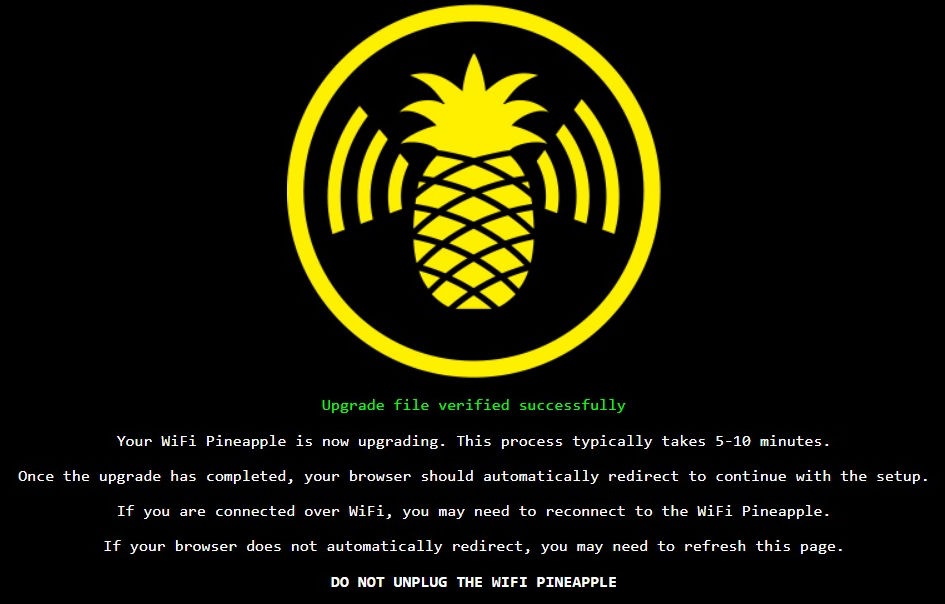
Now is the time to get a fresh cool beer from the fridge, make some coffee or do anything else that will keep you occupied for the next 5 - 10 minutes. Whatever you do, do not unplug the WiFi Pineapple or in any other way interrupt its power.
As soon as the upgrade has completed, the next page will automatically show. If the page does not automatically show, wait for the led to go solid blue and refresh the page.
You will be greeted by the page below:

Welcome! Press 'Get Started' to continue to the next window:
To continue with the WiFi disabled, we need to quickly press and release the reset button on the back of the device again. Doing so will complete the secure setup and show the following page:
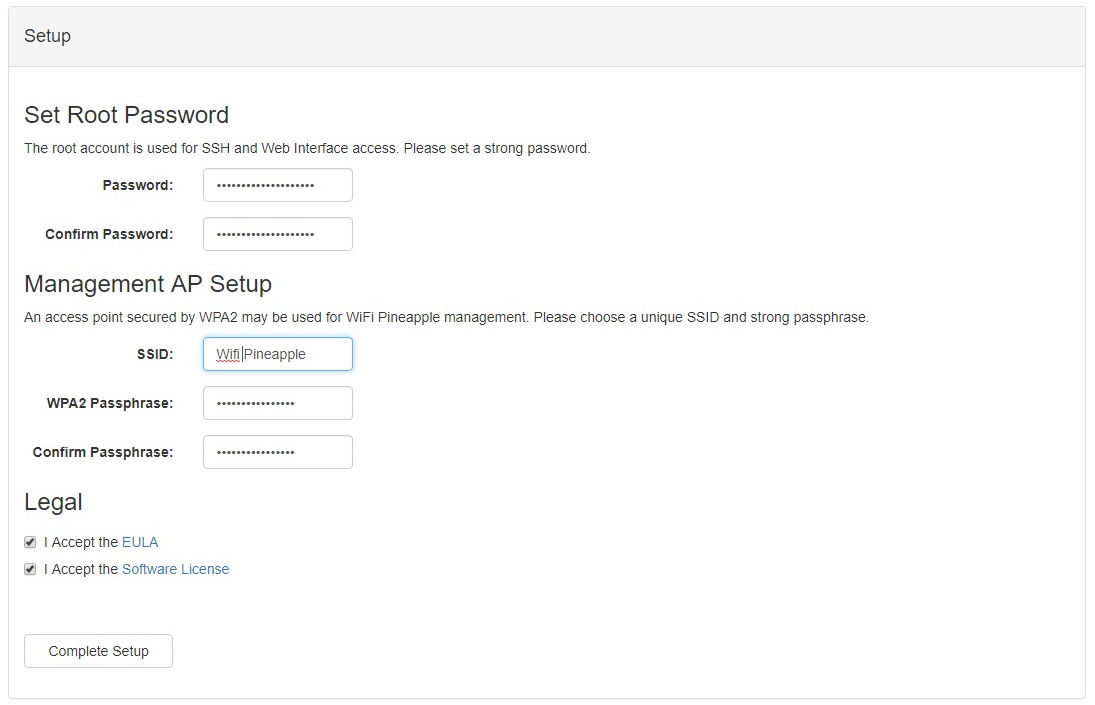
On this page setup your root password and the Pineapple's remote management SSID and password. Make sure these passwords are strong, obviously!
Press the 'Complete Setup' button to continue.
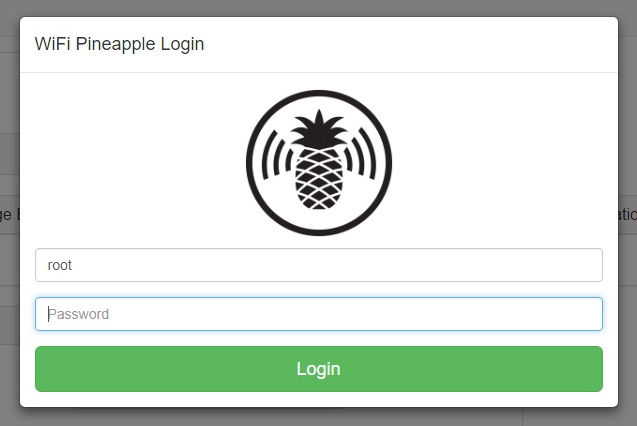
Login with your root password.
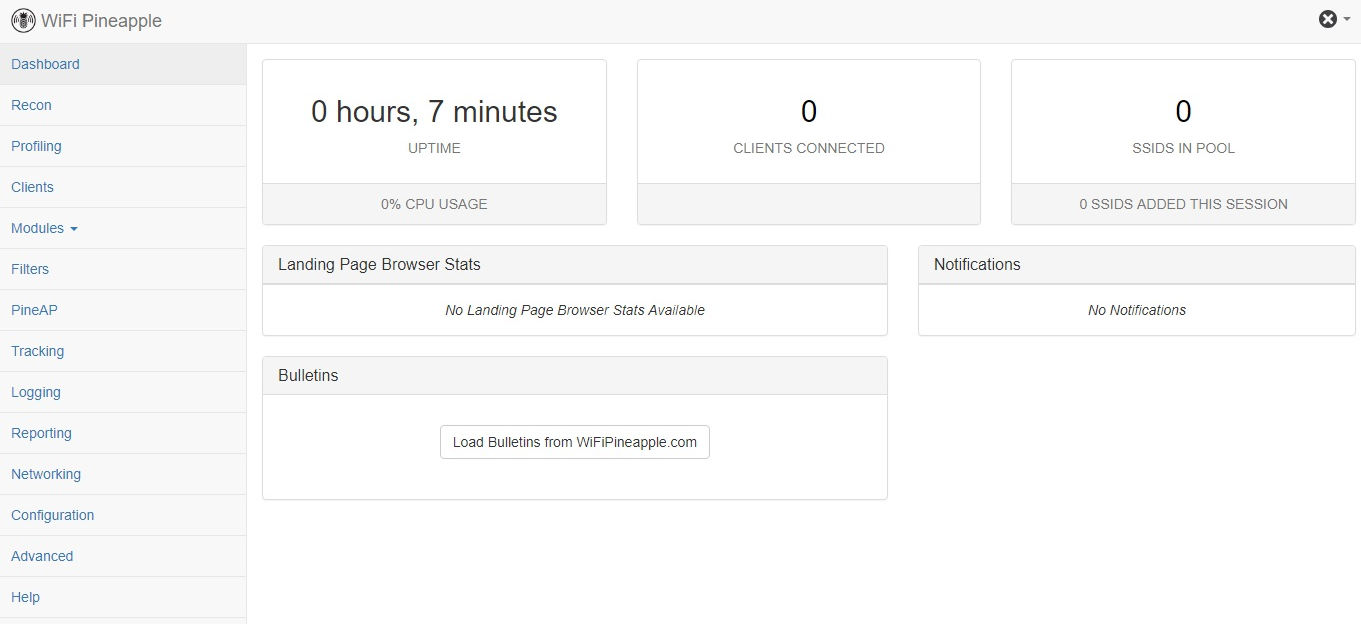
On successful login, you will be taken to the landing page above and setup is complete.
Connect the WiFi Pineapple to the Internet
Now the setup is complete, the Pineapple needs to be able to connect to the Internet. This chapter will cover the details to setup Internet connection sharing and allow the Pineapple to connect to the Internet through your Windows machine. I'll describe the procedure for Windows 10, but it shouldn't be that hard to translate these steps to other Windows versions.
Click the network icon in your system tray (lower-right corner on your screen next, to the system time) and then 'Network settings'.
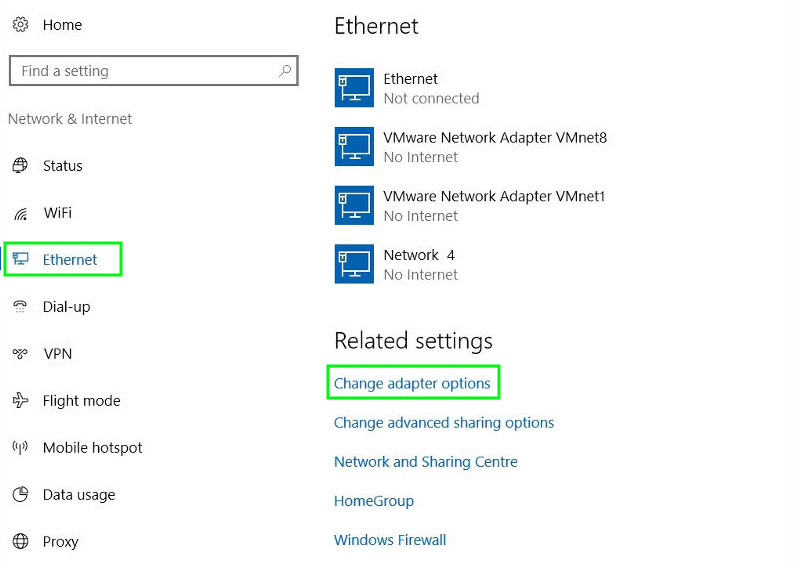
Now click 'Ethernet' and 'Change adapter options'. On the Network connections window that pops up, look for the WiFi Pineapple network interface:

This is a ASIX USB Fast Ethernet adapter and will look like the one in the image above. If you want you can rename it by pressing F2 to make it easier to recognize later on. I renamed it to 'Wifi Pineapple'.
Now right-mouse click on the adapter that is your Internet connection source and click 'Properties'.
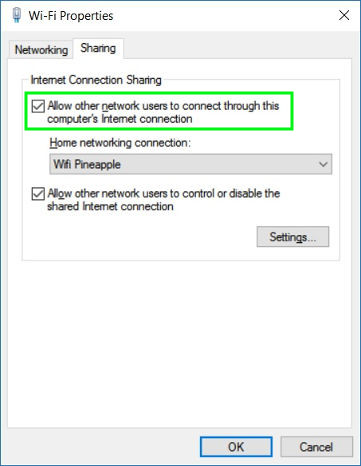
On the properties window that pops up, switch to the 'Sharing'-tab and check 'Allow other network users to connect through this computer's Internet connection'.
Then, from the drop-down, choose the Pineapple adapter's name and press 'OK'.
Back in the network connections window, right-mouse click on the Wifi Pineapple adapter and click 'Properties'. This will popup the following window:
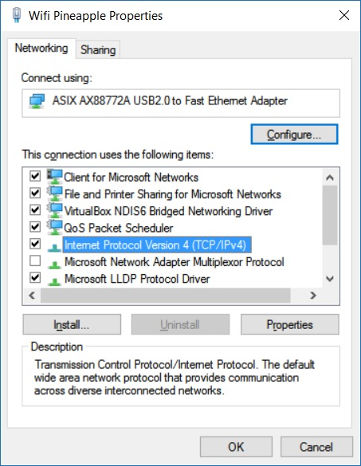
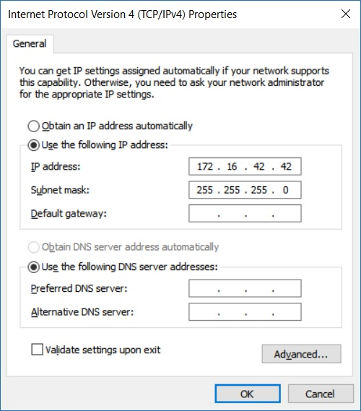
Select 'Internet Protocol Version 4 (TCP/IPv4)' and click 'Properties':
On the WiFi Pineapple's landing page, Bulletins section, press 'Load Bulletins from WifiPineapple.com' button. If it loads, your Pineapple is connected to the Internet correctly.
Now you're all set and ready to go!
I'll be having fun and do some exploring with my new gadget. Expect more write ups on the Pineapple later!